CHOOSING THE RIGHT BOILER WITH WORCESTER BOSCH

I wanted a boiler which was contemporary, technology smart and energy efficient that dresses my new utility space, rather than bolted to the wall in a corner of the kitchen taking up room and being an eyesore. Just the thought of all those dials, messy flumes and entangled pipes escaping from the body of the boiler in all directions gives me cold sweats. I need a boiler thats practical, stylish, and one that is basically a computer. One that can heat my house efficiently, using a smart and easy control interface. One that looks sexy, yes a sexy boiler - who’d have thought that would ever be possible, that looks like something out of back to the future with its contemporary black sleek modern design.

As I said aesthetics are everything; looking stylish and sleek, but keeping my family and I warm and cosy through the cold winter nights is really the top priority. When my plumber suggested Worcester Bosch’s top of the range Greenstar 8000 - it is a stunning, design-led boiler for the heart of a home without any compromise on quality or performance I couldn’t believe such a design existed- Happy days! It’s available with a choice of high gloss black (my choice) or white and has been designed by those clever people at Worcester Bosch to deliver the highest levels of heating comfort for your home. It’s a boiler, but not as you know it…

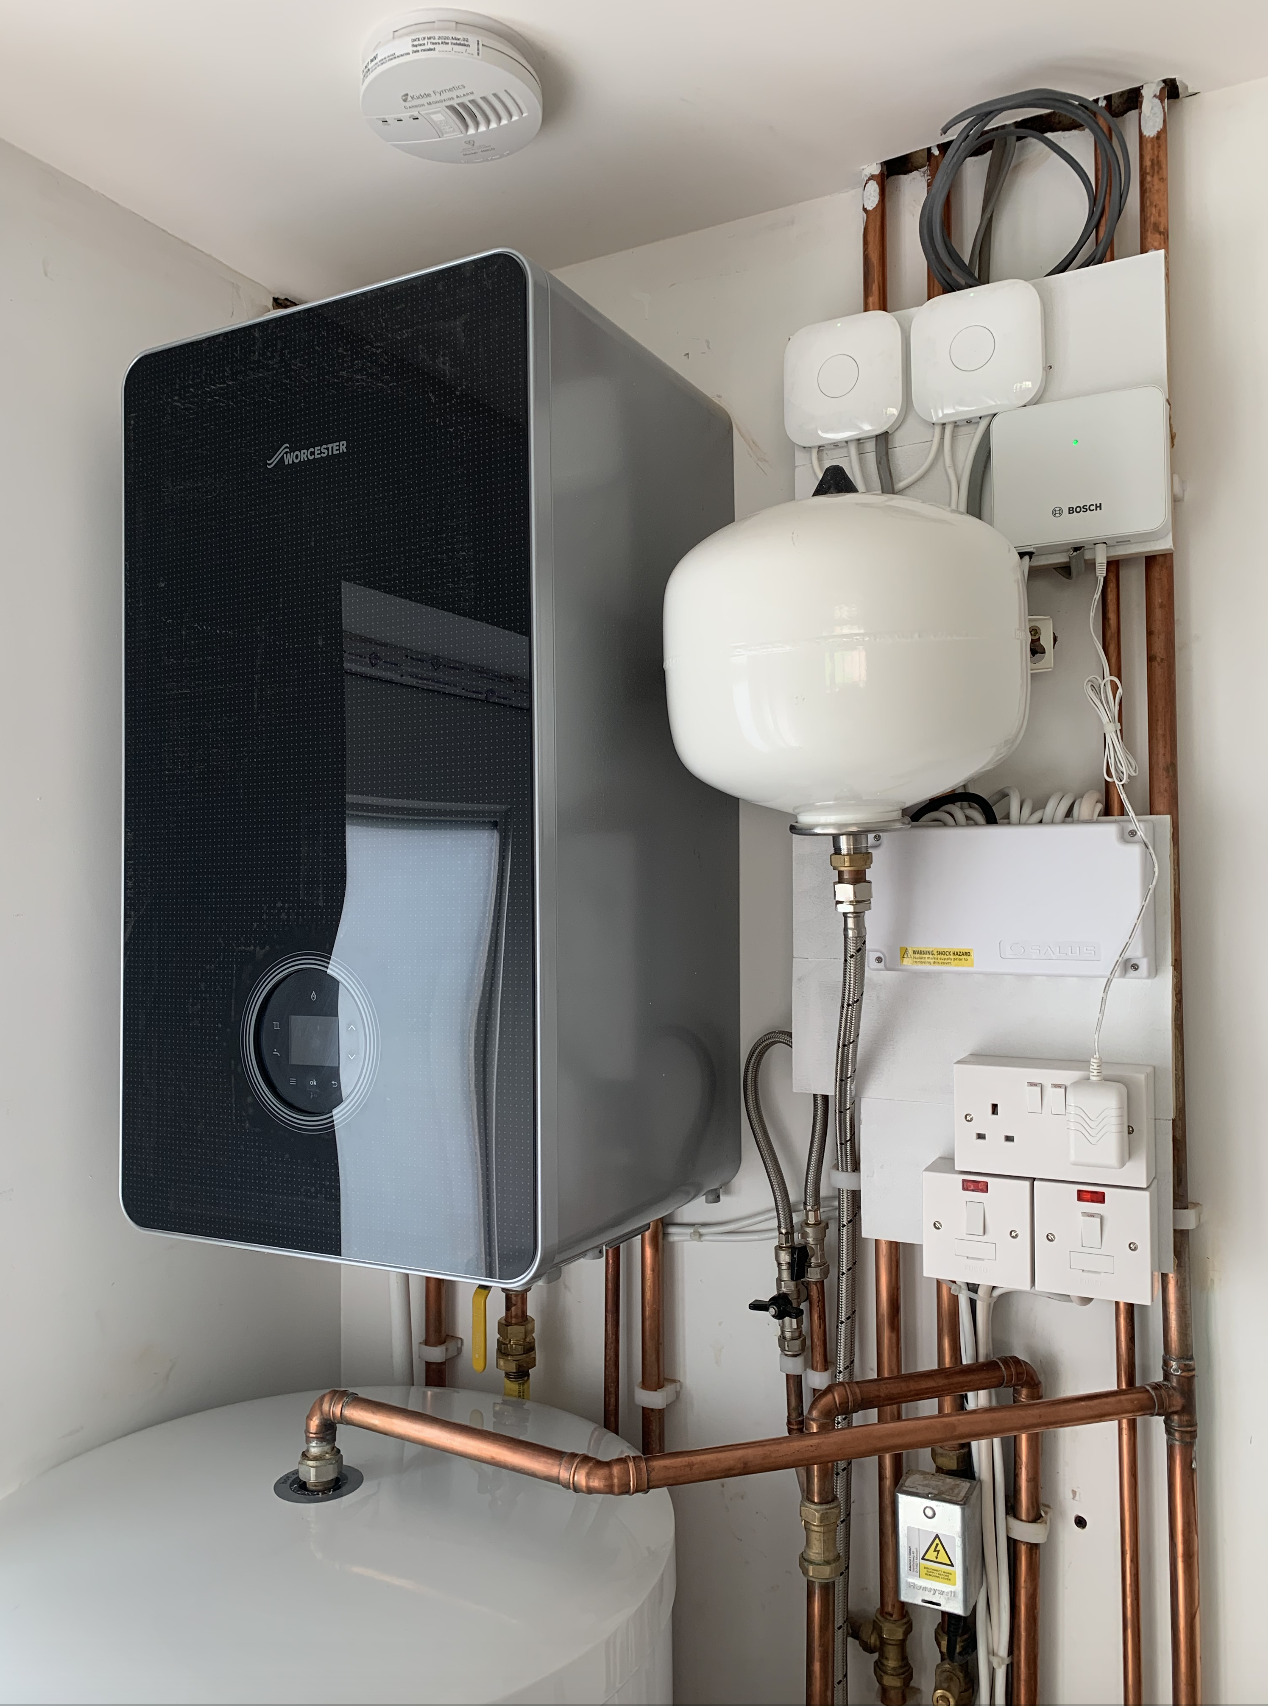
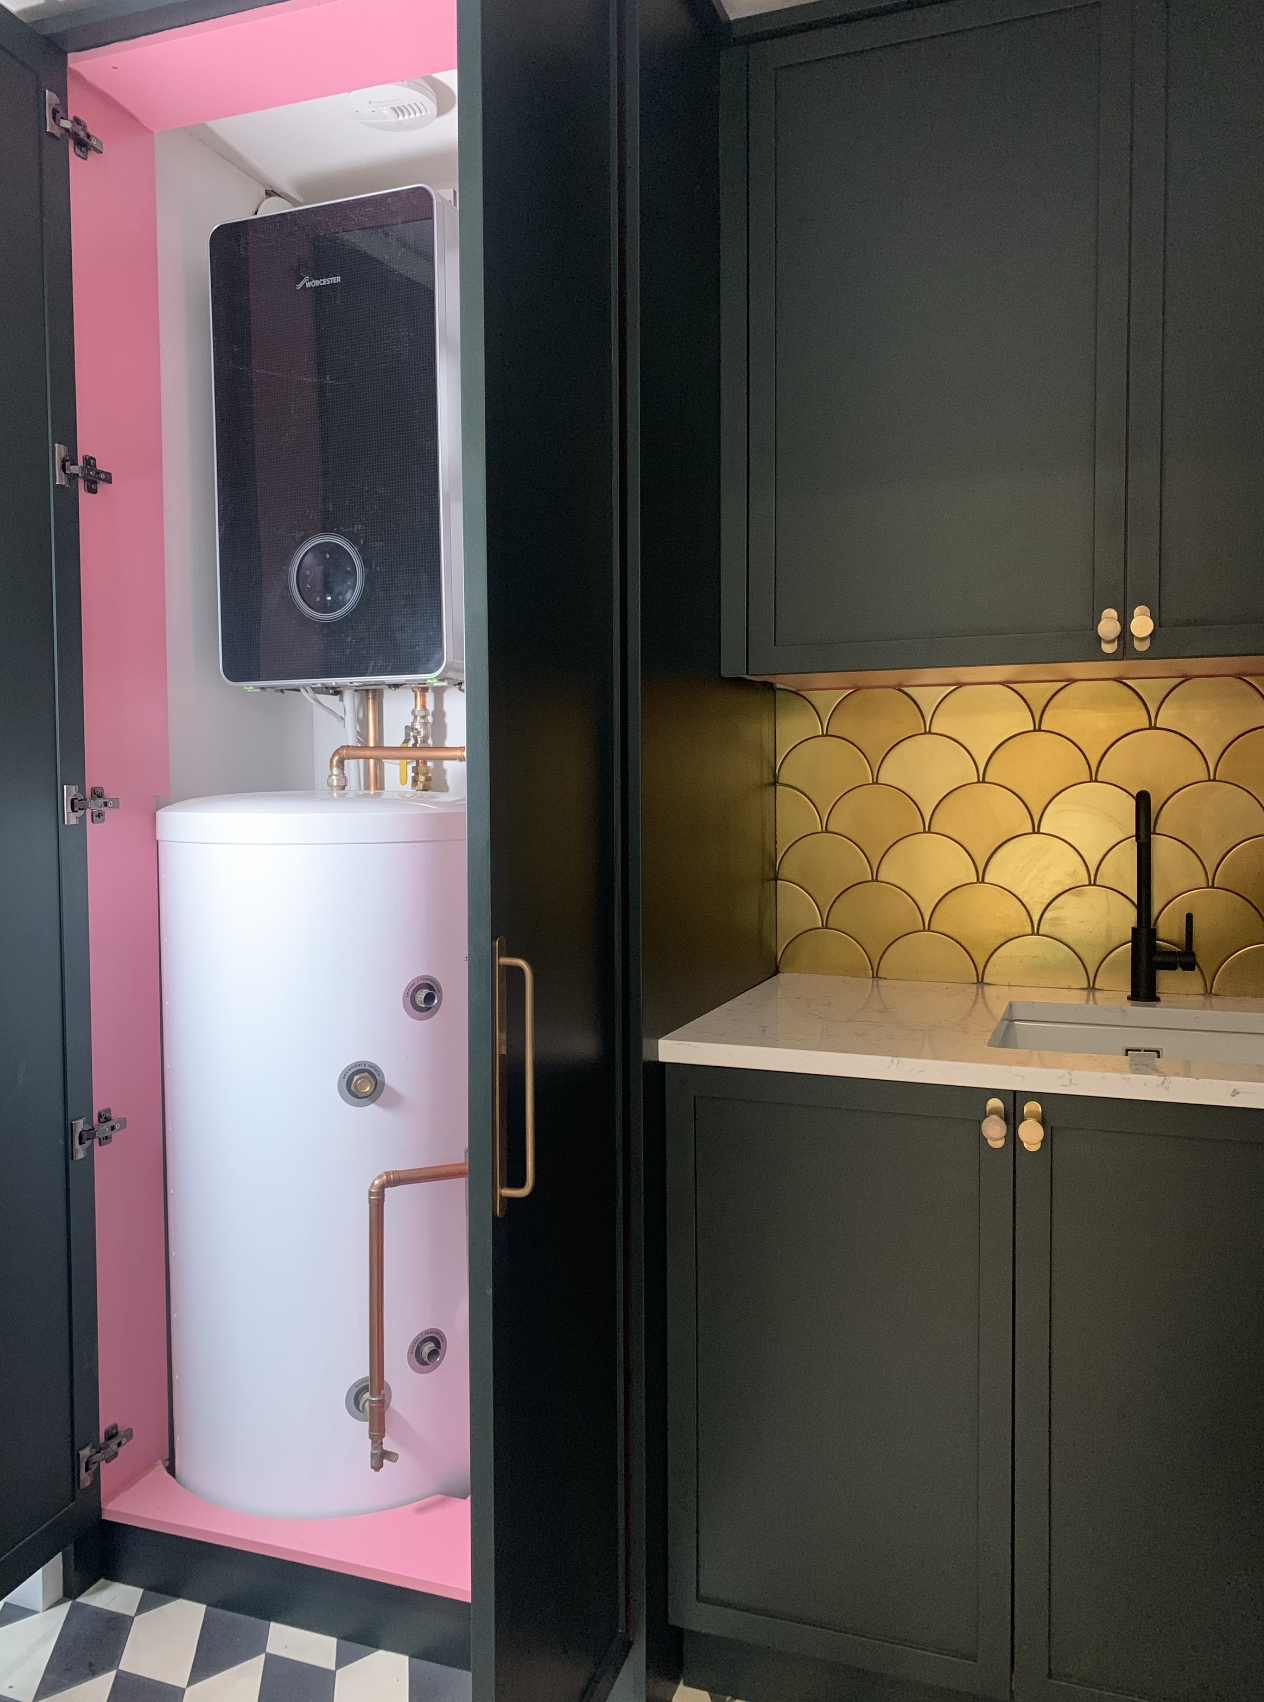
Our Worcester Bosch Greenstar 8000 Boiler in Black, located in our utility room.

Our Worcester Bosch Greenstar 8000 Boiler in Black, located in our utility room.

Innovative technology

The Greenstar 8000 boiler has innovative technology that maximises your comfort and helps to optimise heating and hot water performance around our 4 bedroom detached home (2,200 sq ft approx). As the technology is paired up with the Bosch EasyControl you have the power to effortlessly control your home’s heating and hot water from anywhere (you can get the Bosch ‘EasyControl’ app downloaded on any smartphone). So when we are back to the good o'l’ days (post lockdown) of commuting home from work, we can scroll to the app and adjust the heating to our desired temperature before even getting home. This is handy and efficient if you traditionally had a timer setting on your heating system, and on those regular occasions when the tubes are delayed because ‘of a signal failure’ or the trains are delayed ‘with leaves on the line’ you can adjust the heating to come on when you are nearer home, rather than waste energy, water and heating up an empty home (saving us money too). It also makes life just that little bit easier for all of us, Bosch EasyControl is compatible with Amazon Alexa & Google Assistant giving the ability to control your heating through your smart speakers at home too. Very Back to the Future esque which makes me very happy .

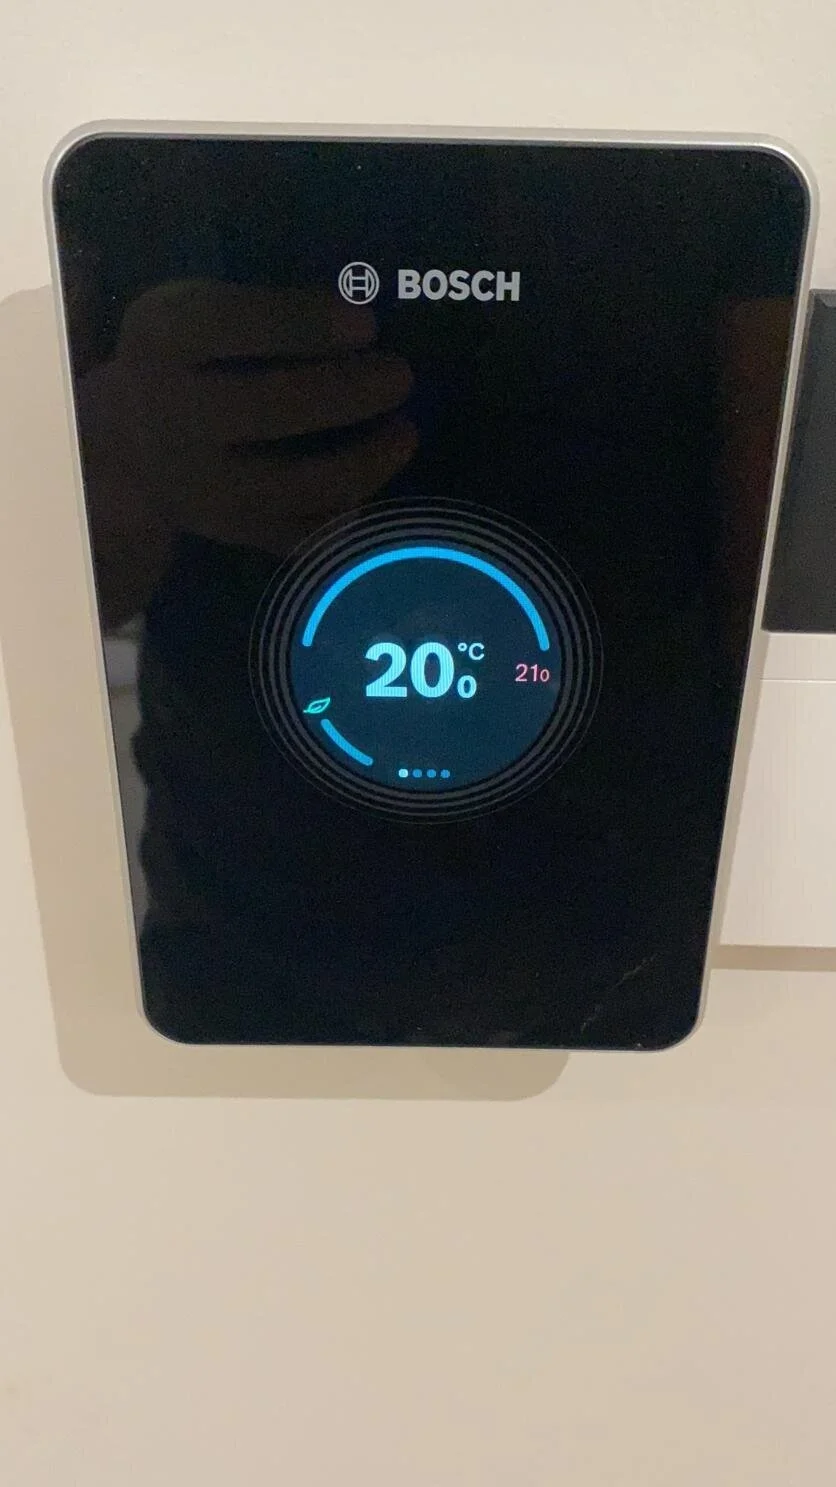
Our Worcester Bosch EasyControl, digital smart thermostat.

Our Worcester Bosch EasyControl, digital smart thermostat.

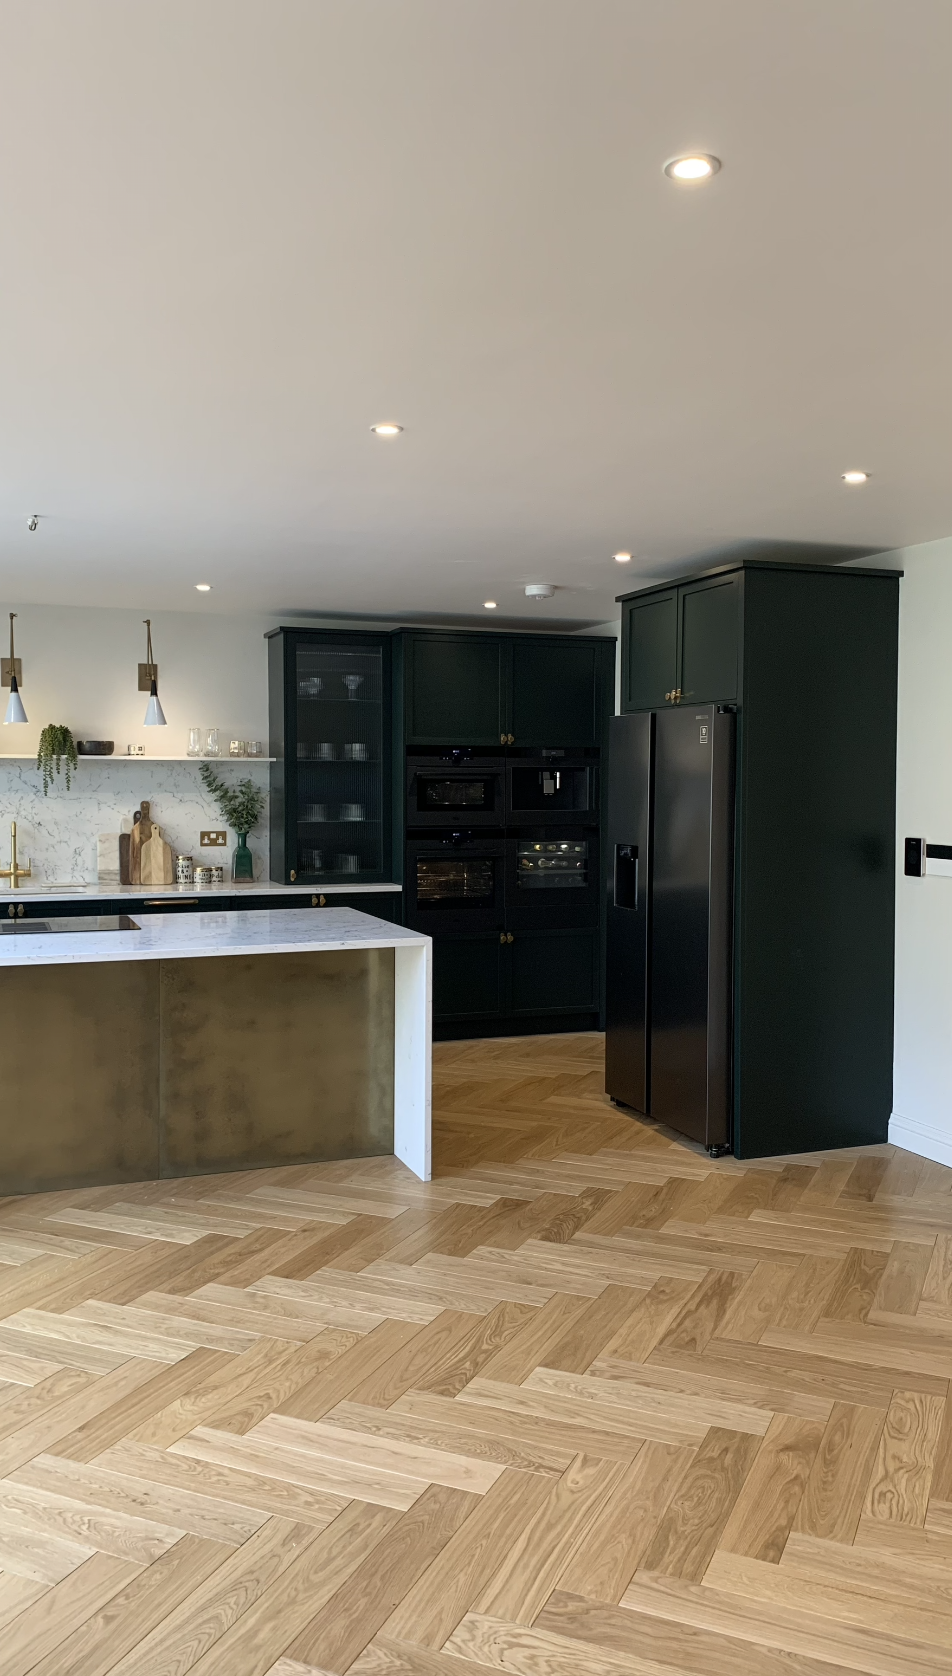
The  Worcester Bosch EasyControl mounted on the wall next to the Fridge/ Freezer.

The Worcester Bosch EasyControl mounted on the wall next to the Fridge/ Freezer.

Greenstore unvented cylinders

We also opted on the recommendation of our plumber and gas safe engineer to add a Greenstore Unvented Cylinder. Developed by Bosch and manufactured by Worcester , this handy cylinder provides us with a complete system solution. There is a choice of 7 capacities, the stainless steel unvented cylinders range from the Greenstore SC-90 to the SC-300 (mine is a Greenstore SC–150 cylinder which is approx. 150 litres capacity, ample for my detached 4 bedroom, 2 and a half bathroom abode). The cylinders combine rapid re-heat times with excellent heat retention and really do deliver hot water at mains pressure. This is an absolute game changer for us seeing as our old house had the water pressure of a wet fart. It was like showering under the last dregs of a leaky watering can each morning- and don’t get me started if someone flushed a toilet whilst you were in there. Thankfully that is all in the past, now we have this. It means we can bath our son, whilst someone else flushes a toilet or takes a shower. Or do some washing up, run the dishwasher, washing machine etc all at the same time- whilst the pressure remains. Genius, huh?. For a full time working mother like me, this is a massive game changer as I’m quite likely to want to do all of those things with a tight 3 hour window when I get home from work.

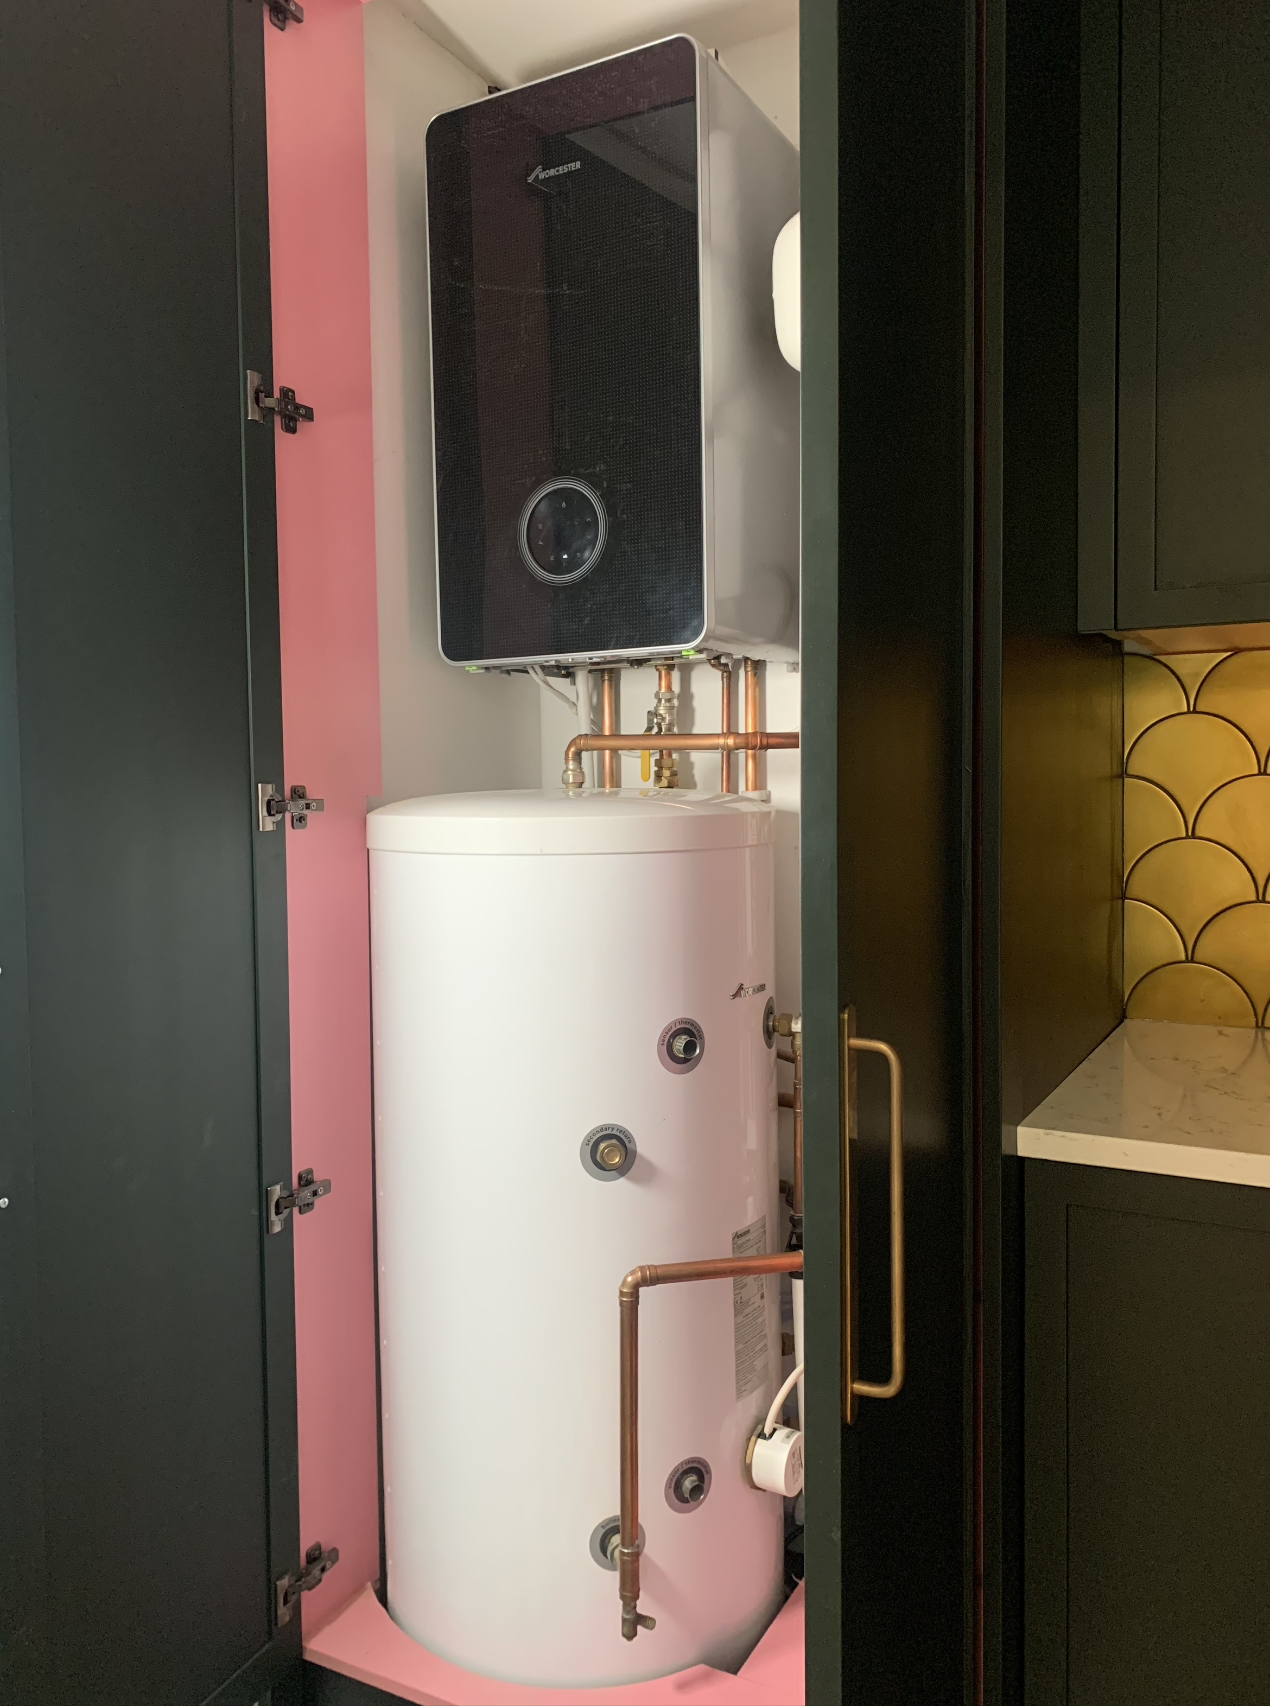
Our Worcester Bosch Greenstar 8000 Boiler in Black, located in our utility room with the Greenstore SC–150 Cylinder

Our Worcester Bosch Greenstar 8000 Boiler in Black, located in our utility room with the Greenstore SC–150 Cylinder

Now, the plan had been to leave the boiler out on display and not box it in, and if we had just got a boiler on its own then we would have, but having the cylinder out on display was not an option for me, so we decided to box it all in. I still think its a gorgeous piece of kit and seeing the sexy black boiler inside this cupboard makes me very happy - plus it hides the pipes too.

Our Worcester Bosch Greenstar 8000 Boiler in Black, located in our utility room with the Greenstore SC–150 Cylinder in our utility room.

Our Worcester Bosch Greenstar 8000 Boiler in Black, located in our utility room with the Greenstore SC–150 Cylinder in our utility room.

Our Worcester Bosch Greenstar 8000 Boiler in Black, located in our utility room with the Greenstore SC–150 Cylinder in our utility room.

Our Worcester Bosch Greenstar 8000 Boiler in Black, located in our utility room with the Greenstore SC–150 Cylinder in our utility room.

Basically, if Carlsberg did boilers and cylinder systems, then this would be the one. Hot water and heating has never been so stylishly delivered and energy efficient all in one package. If you need a new boiler, then look no further than a Worcester Bosch Boiler. And with a 12 year guarantee, it makes it a no brainer too.

**The Greenstar 8000 Style 35k W System in black, Greenstore SC–150 cylinder and Bosch EasyControl Black were all kindly gifted to me for my home renovation by Worcester Bosch. All thoughts and opinions are 100% my own. **

Always get a Gas Safe engineer to fit your boiler. You can find your nearest installer here.

To read more about our renovation, why not check out our plans over on this post

choosing the right boiler with worcester bosch

HOW WE ADDED AN ARADA STOVE TO OUR HOME RENOVATION

Ad/ pr gift. Arada stove kindly gifted us the Stove. All labour and extra materials for fittings and fixtures were paid by us.

I’ve always wanted a wood burning stove. There’s something quite romantic and quaint about them, and ideal for a chilly Britain when the weather turns.

When we first viewed our beloved ‘Rat house’ and saw that it already had two 1930’s original brick fireplaces downstairs, we knew one of them had to be restored for a wood burner to sit in its place.

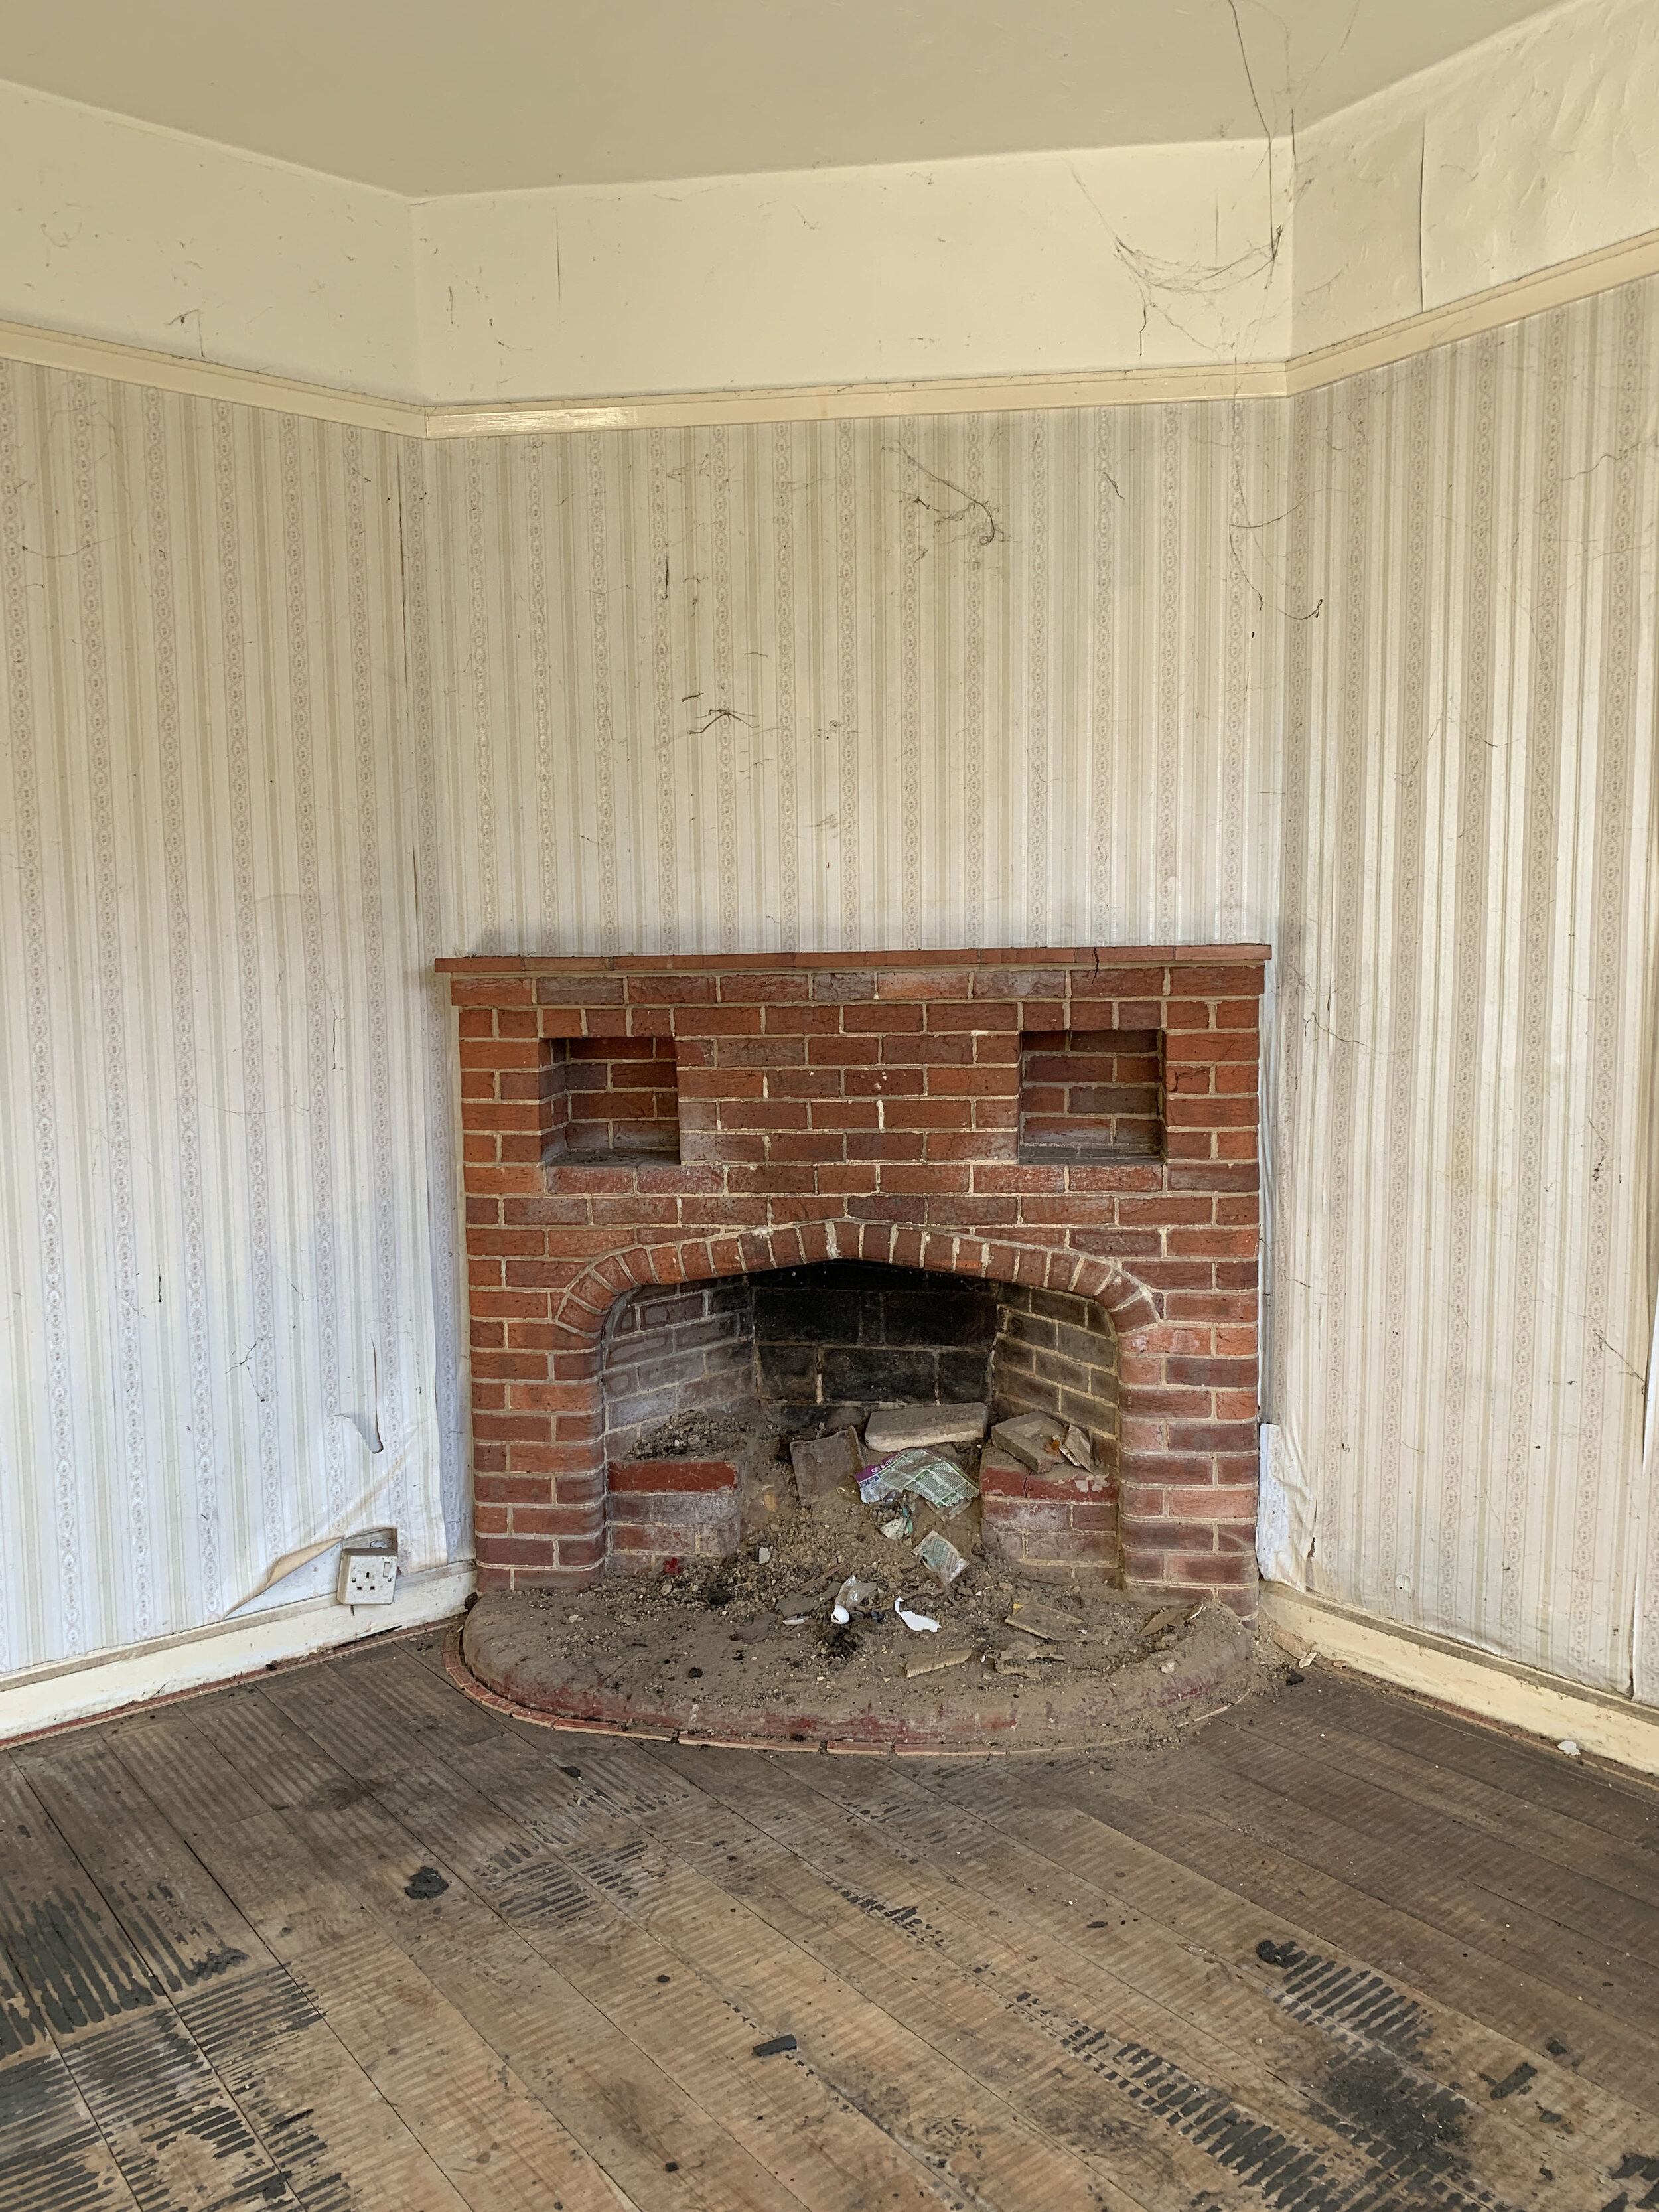
The original Brick fireplace at the Rat house that we decided to change into a wood bu

The original Brick fireplace at the Rat house.

The research

Whilst researching Wood burner stoves, the one thing that was really important to me, was that it had to be eco friendly. I know theres a lot of talk about wood burners not being efficient, so it was important to me to pick one that was eco design ready and had low emissions to have the longevity.

I also decided to have it fitted in the smaller of the two reception rooms, which is also our snug room, so picking one with the right heat output is important too. As its a small-ish room, I needed one that had a 4-5kw output.

With this in mind I chose the Solution 5 Smoke Control (S3) from Arada Stoves.

This clever little Arada stove is Ecodesign ready, has high efficiency and gives off low emissions. It’s also suitable for burning wood and multi fuel. Plus it has a heat output of 4.9kW output so was the ideal spec for our snug.

The fitting

This is where we called in the experts, aka our builders who are the kings of all things structural. Because taking an existing fireplace involves some structural work where lintels are involved. (Lintels are the joists holding the chimney stack up- so quite important not to mess around with if you don’t know what you’re doing).

Our builders safely removed the existing Brick fireplace which by the way I have zero regrets about removing. Yes it was original, but it was FUGLY and I didn’t want it in our home for a second longer. And at the end of the day, you’ve gotta do what you want, for your home. Plus we were adding character back in with a stove, as thats what they do.

The removal of the brick fireplace

The removal of the brick fireplace

Once the fireplace was removed we called in an expert chimney sweeper to give the chimney a really good clean out in preparation.

Then, this is where it gets a little bit more tricky- we needed to line the chimney with a flexible chimney flue liner in order to fit a stove. Now, luckily for us our builders are skilled in this area, otherwise we would have had to call on a Wood burner expert to fit it for us.

It involves someone climbing up on the roof safely, and threading the flexible Flue liner down the chimney - until it reaches the exit in the snug. Luckily we had scaffolding up during our build, so I’d recommend doing this whilst you’re having your building work done and not adding it after. Or you’ll need a very long ladder and someone else inside to help pull the flue liner through.

FITTED FLUE .jpg
This is the  Plane register plate 1000mm x 400mm (To block chimney off above our stove. It allows the flexible flue pipe to run through and meet the enamelled stove pipe. This plane register plate was part of the kit from Trade Price Flues.

This is the Plane register plate 1000mm x 400mm (To block chimney off above our stove. It allows the flexible flue pipe to run through and meet the enamelled stove pipe. This plane register plate was part of the kit from Trade Price Flues.

I bought a kit with a 15m Flexible flue from Trade Price Flues, which you can buy from here. Because of our high chimney our kit cost £414 which is the going rate for these sorts of kits.

The kit included …

  • Super Flex Chimney flue liner (To line your masonry chimney) we chose a 15m one for ours .

  • Plane register plate 1000mm x 400mm (To block chimney off above your appliance and your stove pipe to run through)

  • Stove pipe to Super Flex adapter ( To connect to your stove pipe to your Super Flex chimney liner)

  • 1000mm (1m) matt black vitreous enamelled stove pipe (To insert into the spigot on your stove / appliance)

  • Pot Hanger Rain Cap (To suspend flue liner at the chimney pot)

  • Nose Cone ( To attach to your Super Flex Flue liner for installation) 

  • Carbon Monoxide Alarm (To make you aware carbon monoxide is present if there is a problem)

  • 500g Black Fire cement to  join your stove pipe to the spigot of your stove / appliance) 

Altho the kit came with a 1000mm (1m) matt black vitreous enamelled stove pipe (To insert into the spigot on your stove / appliance), we needed to buy a thicker twin wall insultated enammed stove pipe to meet building regs on our build, so bought this one from Amazon- 500mm Length Twin Wall Insulated Flue Pipe Inc Locking.

The much thicker twin wall insultated enammed stove pipe to meet building regs on our build. We bought this one from Amazon-  500mm Length Twin Wall Insulated Flue Pipe Inc Locking.

The much thicker twin wall insultated enammed stove pipe to meet building regs on our build. We bought this one from Amazon- 500mm Length Twin Wall Insulated Flue Pipe Inc Locking.

This is what 15m of Flexible flue from Trade Price Flues looks like ready to go inside our chimney.

This is what 15m of Flexible flue from Trade Price Flues looks like ready to go inside our chimney.


The Design

I now had to decide how I wanted to incorporate he Wood burner into the snug and make a feature out of it. As our house is a 1930’s and I had taken the original brick fireplace out, I managed to find an original 1930’s wooden fireplace surround on eBay for £26, plus the £20 delivery to get it to us- so it was an absolute bargain and something that felt like fate.

I found this original 1930’s wooden surround on Ebay for £26.

I found this original 1930’s wooden surround on Ebay for £26.

For the hearth I went to my local stone masons yard and asked if they had any off cuts and they managed to cut a piece of quartz stone for me for £40. It’s definitely worth asking them if you’re looking for one too. Plus this way you can have it custom cut to any size, spec and colour.

For the wall lining the wood burner, I chose the Torran Marquina Tiles from Topps Tiles, which are a black marble effect tile. These are the 60 x 30cm rectangular size and are suitable to be used for Multi-Fuel Stove Surrounds. At £6.64 a tile, and only needing 12 tiles, these were also a bargain to complete the look.

Our builders did all the fitting of the whole thing, installing the hearth, wall tiles, flue and connecting up the Arada Stove.

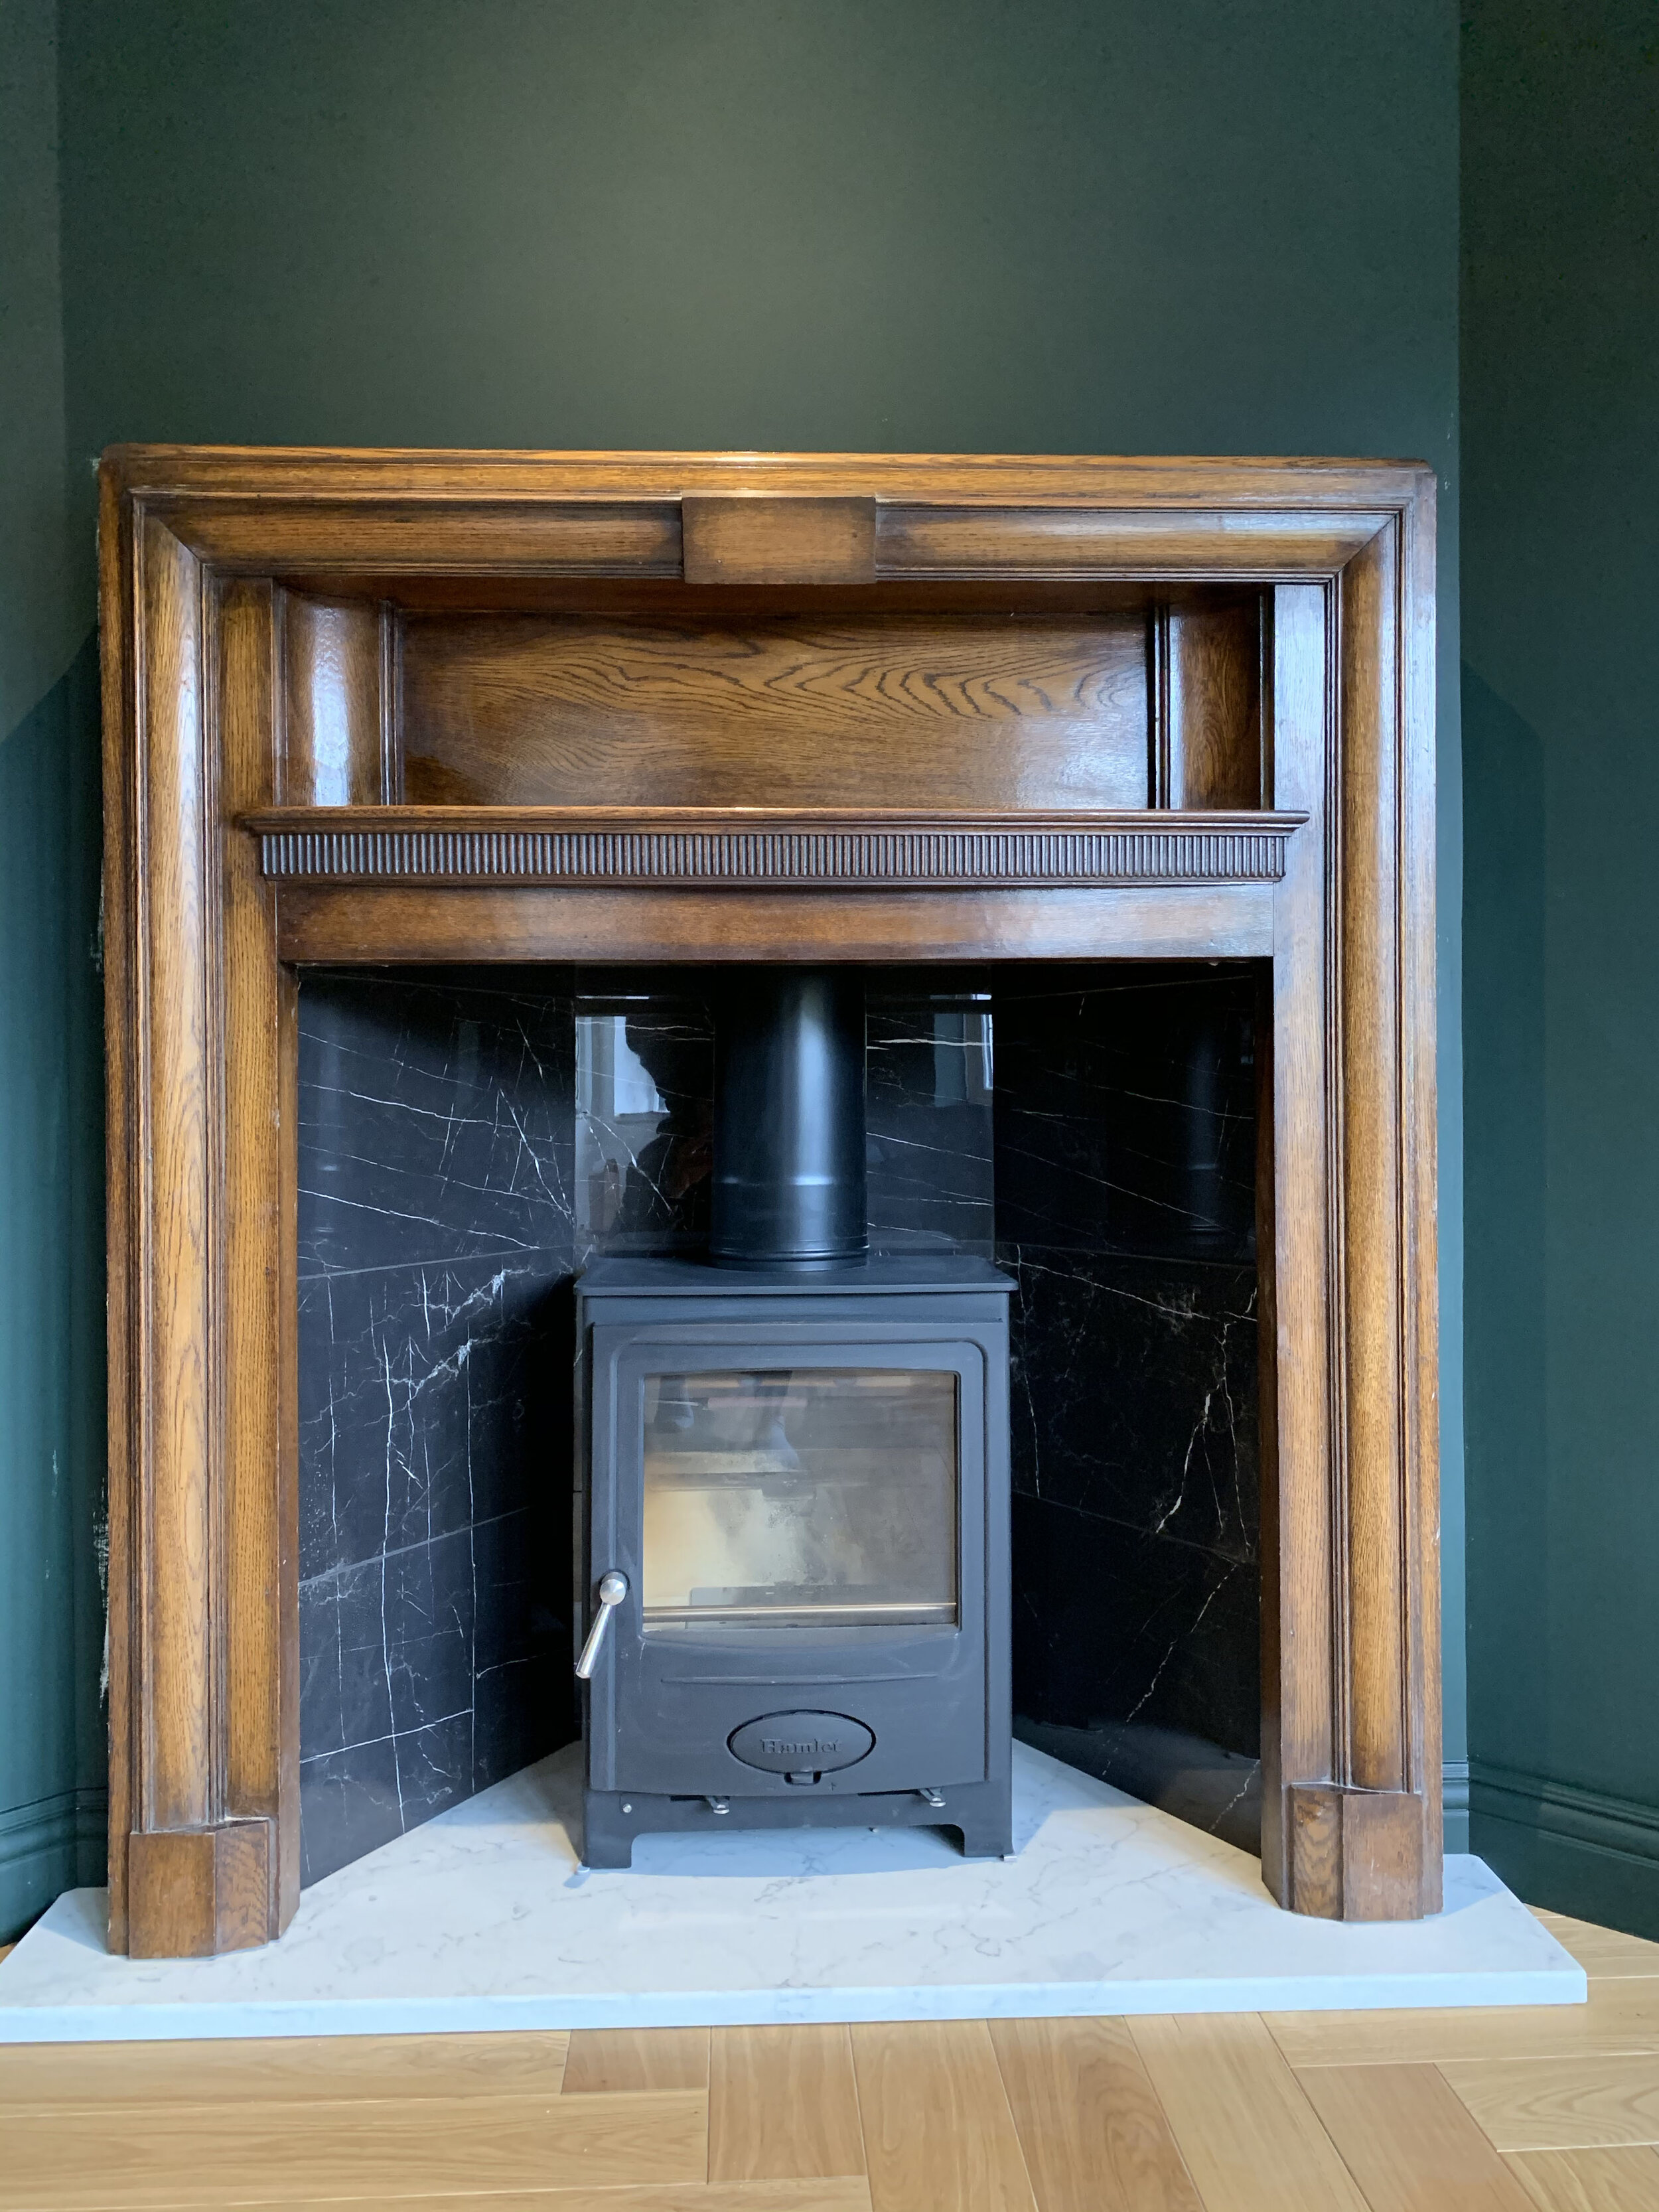
Our Solution 5 Smoke Control (S3) Arada Stove, Vintage 1930’s surround from Ebay,  Torran Marquina black marble  Tiles from Topps Tiles, in 60cm x 30cm size and the stone hearth was sourced from a local stone mason, Lick Paint Dark Holly Green 06 in…

Our Solution 5 Smoke Control (S3) Arada Stove, Vintage 1930’s surround from Ebay, Torran Marquina black marble Tiles from Topps Tiles, in 60cm x 30cm size and the stone hearth was sourced from a local stone mason, Lick Paint Dark Holly Green 06 in Matt for the wall above the picture rail ( £38 for 2.5L)

We also fitted a Carbon Monoxide Alarm on the ceiling, which is essential when fitting a wood burner stove or fireplace in any home. Once it was all fitted and tested, it was all signed off by building control as it was part of our build.

Our Solution 5 Smoke Control (S3) Arada Stove, Vintage 1930’s surround from Ebay,  Torran Marquina black marble  Tiles from Topps Tiles, in 60cm x 30cm size and the stone hearth was sourced from a local stone mason, Wallpaper is the Jungle Faunacati…

Our Solution 5 Smoke Control (S3) Arada Stove, Vintage 1930’s surround from Ebay, Torran Marquina black marble Tiles from Topps Tiles, in 60cm x 30cm size and the stone hearth was sourced from a local stone mason, Wallpaper is the Jungle Faunacation from Divine Savages , Lick Paint Dark Holly Green 06 in Matt for the wall above the picture rail ( £38 for 2.5L)

Christmas time with our Solution 5 Smoke Control (S3) Arada Stove, Lick Paint Dark Holly Green 06 in Matt for the wall above the picture rail ( £38 for 2.5L)

Christmas time with our Solution 5 Smoke Control (S3) Arada Stove, Lick Paint Dark Holly Green 06 in Matt for the wall above the picture rail ( £38 for 2.5L)

Christmas time with our Solution 5 Smoke Control (S3) Arada Stove, Lick Paint Dark Holly Green 06 in Matt for the wall above the picture rail ( £38 for 2.5L)

Christmas time with our Solution 5 Smoke Control (S3) Arada Stove, Lick Paint Dark Holly Green 06 in Matt for the wall above the picture rail ( £38 for 2.5L)

Christmas time with our Solution 5 Smoke Control (S3) Arada Stove.  Wallpaper from Divine Savages - Jungle Faunacation, Lick Paint Dark Holly Green 06 in Matt for the wall above the picture rail ( £38 for 2.5L)

Christmas time with our Solution 5 Smoke Control (S3) Arada Stove. Wallpaper from Divine Savages - Jungle Faunacation, Lick Paint Dark Holly Green 06 in Matt for the wall above the picture rail ( £38 for 2.5L)

It’s now in and ready to use and we absolutely love our Arada Solution 5 Smoke Control (S3) wood burner. I’m so happy we decided to add one to our snug. It brings warmth when we don’t want to whack the heating on, and feels magical having it fired up now it’s Christmas. It was truly the best idea, and brings character to a previously bland room which had a fugly brick fireplace and wasn’t too difficult to convert the already working fireplace into a safe space for an Arada Wood Burner.

Arada Stoves kindly gifted me the Solution 5 Smoke Control (S3) stove with no obligation to post. All thoughts and opinions are 100% my own.

If you want to read more about the design of our snug you can read it here.

HOW WE ADDED AN ARADA WOOD BURNER STOVE

OTIS' DINOSAUR TODDLER BEDROOM

Holy smokes we’ve been living in our newly renovated Rat house for 6 weeks now. It’s gone super fast which I know is cliche to say, but when you’ve got unboxing to do each evening after work, the nights start blurring into each other.

Back in September I wrote about my plans for Otis’ big boy bedroom which you can read here, and I’m excited to finally show you how it all turned out. I’d also love to know if you think it lives up to the mood-board plan?

The amended moodboard for Otis’ big boy toddler bedroom. You can read the previous blog post here, and see the previous moodboard.

The amended moodboard for Otis’ big boy toddler bedroom. You can read the previous blog post here, and see the previous moodboard.

The brief, which I set myself, obviously, was to create a bedroom that was fun, creative, engaging and sparked imagination. I also wanted it to feel calm, yet playful and be a space to play, read and sleep in.

The starting point was the majestic ‘Exticntopia’ wallpaper from Divine Savages which ticked all the boxes for me (and Otis). Dinosaurs- tick, not too babyish- tick, from a credible design duo who in my opinion can never do wrong - tick, tick tick!

My intention was never to do a typically old fashioned gender obvious blue bedroom, but I just fell in love with the Glacier blue colour way of the Divine Savages ‘Extinctopia’ wallpaper and the colour scheme just built from there.

I decided to wallpaper two of the four walls. My reason for doing this was so we had a plain wall to hang some artwork on. This wall will also be where we will put a wardrobe and chest of drawers so it’s still a work in progress behind the scenes, as we currently have some miss-matched furniture which is doing the job, but isn’t insta worthy… yet.

The other wall has a large window looking out to a lovely tree lined view, so all it needed was a good window treatment. Plus, because of the plain painted wall, I could add a printed Roman blind to add more texture to the room.

I chose a gorgeous Roman blind from Hillarys blinds in a jacquard print called Jagger, in the colourway Denim. This Roman blind is also a black out blind, which is essential for a toddler. I love how its hung inside the window, so I could also add curtains down the line for more texture and warmth.

Hilarys Blinds also added a safety control so the cord is always pulled tight for safety, which you can see below. I love how the ‘Jagger’ print adds a hint of animal / jungle to the room too.

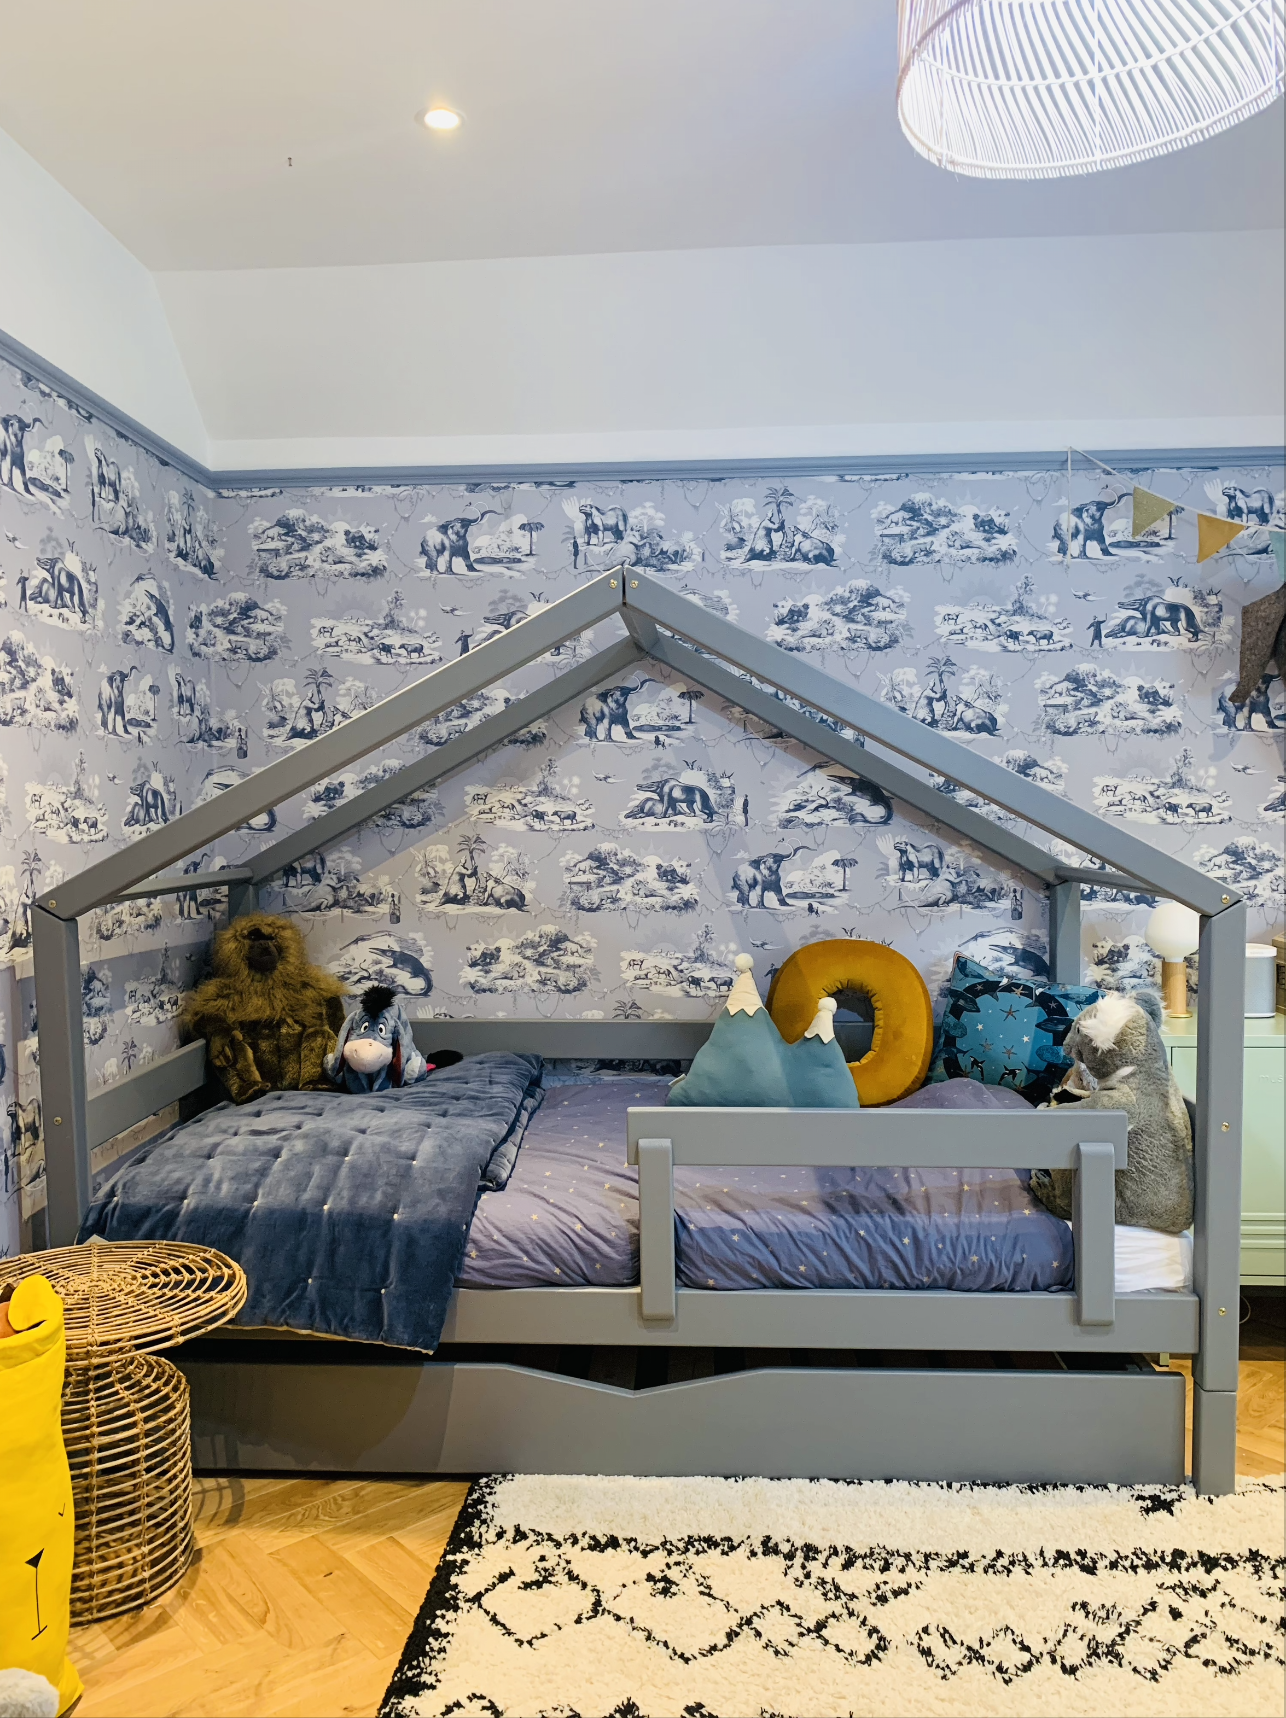
Lucky House bed from Interie from £368, Divine Savages ‘Extinctopia’ wallpaper £150 per roll, Hillarys Blinds- Roman Blind in Jacquard print ‘Jagger’,

Lucky House bed from Interie from £368, Divine Savages ‘Extinctopia’ wallpaper £150 per roll, Hillarys Blinds- Roman Blind in Jacquard print ‘Jagger’,

Hillarys Blinds- Roman Blind in Jacquard print ‘Jagger’

Hillarys Blinds- Roman Blind in Jacquard print ‘Jagger’

Hillarys Blinds- Roman Blind in Jacquard print ‘Jagger’,

Hillarys Blinds- Roman Blind in Jacquard print ‘Jagger’,

The only big change from my original mood-board was the decision to upgrade Otis’ bed from his cot bed to a proper big boy single bed. Taking the sides off his previous cot was great for a temporary solution, but I couldn’t get in and snuggle with him at story time, so we knew we had to get him a single bed next.

We chose the Lucky house bed from Interie in the grey, which matches the blue wallpaper and paint perfectly. In fact, the wall colour actually makes the bed look like its blue instead of grey because it’s such a great tonal match so that was a happy accident.. We added a trundle and the additional bed legs so so that eventually when normal life resumes, Otis can have his cousin come to stay, or I can just fill it with toys and have more storage, so its a win win all round.

The rug was something which we had in the old house and is from La Redoute, and you might even remember it from Otis’ old jungle bedroom? Its the Afaw rug in the larger size - 200 x 290cm.

Mustard made ‘Lowdown locker‘ in sage- from mustard made £249,  Divine Savages ‘Extinctopia’ wallpaper £150 per roll.

Mustard made ‘Lowdown locker‘ in sage- from mustard made £249, Divine Savages ‘Extinctopia’ wallpaper £150 per roll.

We also decided to go for a bigger locker, and chose the Mustard Made Sage ‘Lowdown’ locker, as its brilliant for storing Otis’ books.

Framed prints from Poster Lounge Dieter Braun -Prices from £17.95

Framed prints from Poster Lounge Dieter Braun -Prices from £17.95

My dino mad two year old seems pretty chuffed with his new bedroom, and surprisingly sleeps amazing in here, even with such excitement around him. What do you think? Do you think it hit the brief?

OTIS' BEDROOM FINAL MOODBOARD WITH NUMBERS

  1. Wallpaper - Extinctopia in 'Glacier Blue’ from Divine Savages £150 a roll

2. Hibou Home - Starry Sky Organic Bed Linen in Indigo from Scandi born £55.00

3. Scandi born Sebra Bed Canopy in Denim Blue £98.95

4. Bunting Garland - Scandi born £24.95 in blues and ochres.

5. Lampshade -’Java’ lampshade from Made.com £49

6. Bamboo shelf - The Round Dorm shelf - From Nordic nest £109

7. Fiona Walker England Elephant head £74.95

8. Wall paint - Little Green ‘James’ in Intelligent emulsion for the walls, and Eggshell finish for the woodwork

9. Pictures from Poster Lounge from £17.95

10. LA REDOUTE INTERIEURS Waska Single Wardrobe with Cane Door £599

11. LA REDOUTE INTERIEURS Afaw Berber-Style Rug prices from £99

12. Interie ‘Lucky’ House Bed prices from £368

13. Mustard made ‘Lowdown locker‘ in sage- from mustard made £249

14. Nobodinoz Nevada Teepee in Farniente Yellow £159.95 from Scandi born

15. Nobodinoz Snowy Mountain Cushion in Magic Green from Scandi Born £24.95


AD/PR GIFT Declaration - The Extinctopia wallpaper from Divine Savages has very kindly been gifted to me. My thoughts, opinions and styling ideas for the room based on the mood-board are all my own. In a nutshell I BLOODY LOVE IT!

OTIS' DINOSAUR TODDLER BEDROOM

MAKING THE MOST OF SPACE IN YOUR DESIGNER BATHROOM

If there’s one secret ingredient to achieving the bathroom of your dreams, it is understanding how to make the most of whatever space is available.

People with only modestly sized bathrooms often bemoan the fact that their luxurious visions just won’t work with the dimensions they’ve been dealt. The best thing to do is to flip the problem around. The challenge isn’t trying to shoehorn a design into the available space. It is picking a layout and style that optimizes the space that is there.

Here are some top tips from leading London-based bathroom specialists Aston Matthews on how to make the most of your space even when you have little to work with. Click here to find out more.

Think smart about storage

Bathroom units can be essential for providing storage and they can also act as a key visual feature for your design. But units also take up space, so when that is at a premium in your bathroom, it is important to weigh up the pros and cons.

Be clinical about what does and does not need to live in your bathroom. If it can be stored elsewhere without major inconvenience, get it out. Then think creatively about where to locate any remaining storage. For example, under the sink vanity units are a staple of many bathrooms, but they also take up precious space.

Under basin bathroom storage -image from Pinterest.

Under basin bathroom storage -image from Pinterest.

Wall-mounted basins, on the other hand, or those on metal consoles with towel racks incorporated, really open up the space underneath. If you do want shelving or a vanity unit, consider mounting it high up the wall somewhere, out of the way. The more floor space you can leave free, the bigger your bathroom will feel.


Wall mounted basin - Image from Pinterest

Wall mounted basin - Image from Pinterest

Layout, light and mirrors

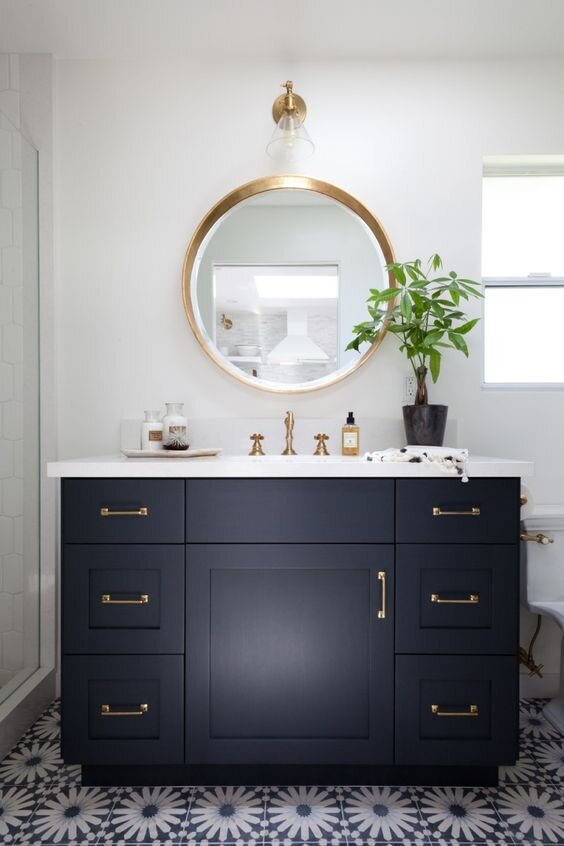
Aside from stripping back the objects in your bathroom to free up the floor area, maximizing space in your bathroom is a game of impressions as much as it is practicalities. The key point is, you can’t create space that isn’t there. But you can make it look more than it is. In terms of layouts, corner basins, bath tubs, shower units or even toilets are a great way to use what would otherwise be ‘dead space’ and leave more of the room looking open. If that is too radical, you can create similar impressions with lighting and mirrors. We all know the effect mirrors can have on making any space look bigger, and an attractive, high quality example is worth the investment as a feature piece for your bathroom that takes up no additional space.


Bathroom mirror inspiration -from Pinterest.

Bathroom mirror inspiration -from Pinterest.

To capitalize on what a large mirror adds, swap a single, central light for distributed lighting around the room. This avoids dark corners and shadows which make a room feel smaller.