HOW WE ADDED AN ARADA STOVE TO OUR HOME RENOVATION

Ad/ pr gift. Arada stove kindly gifted us the Stove. All labour and extra materials for fittings and fixtures were paid by us.

I’ve always wanted a wood burning stove. There’s something quite romantic and quaint about them, and ideal for a chilly Britain when the weather turns.

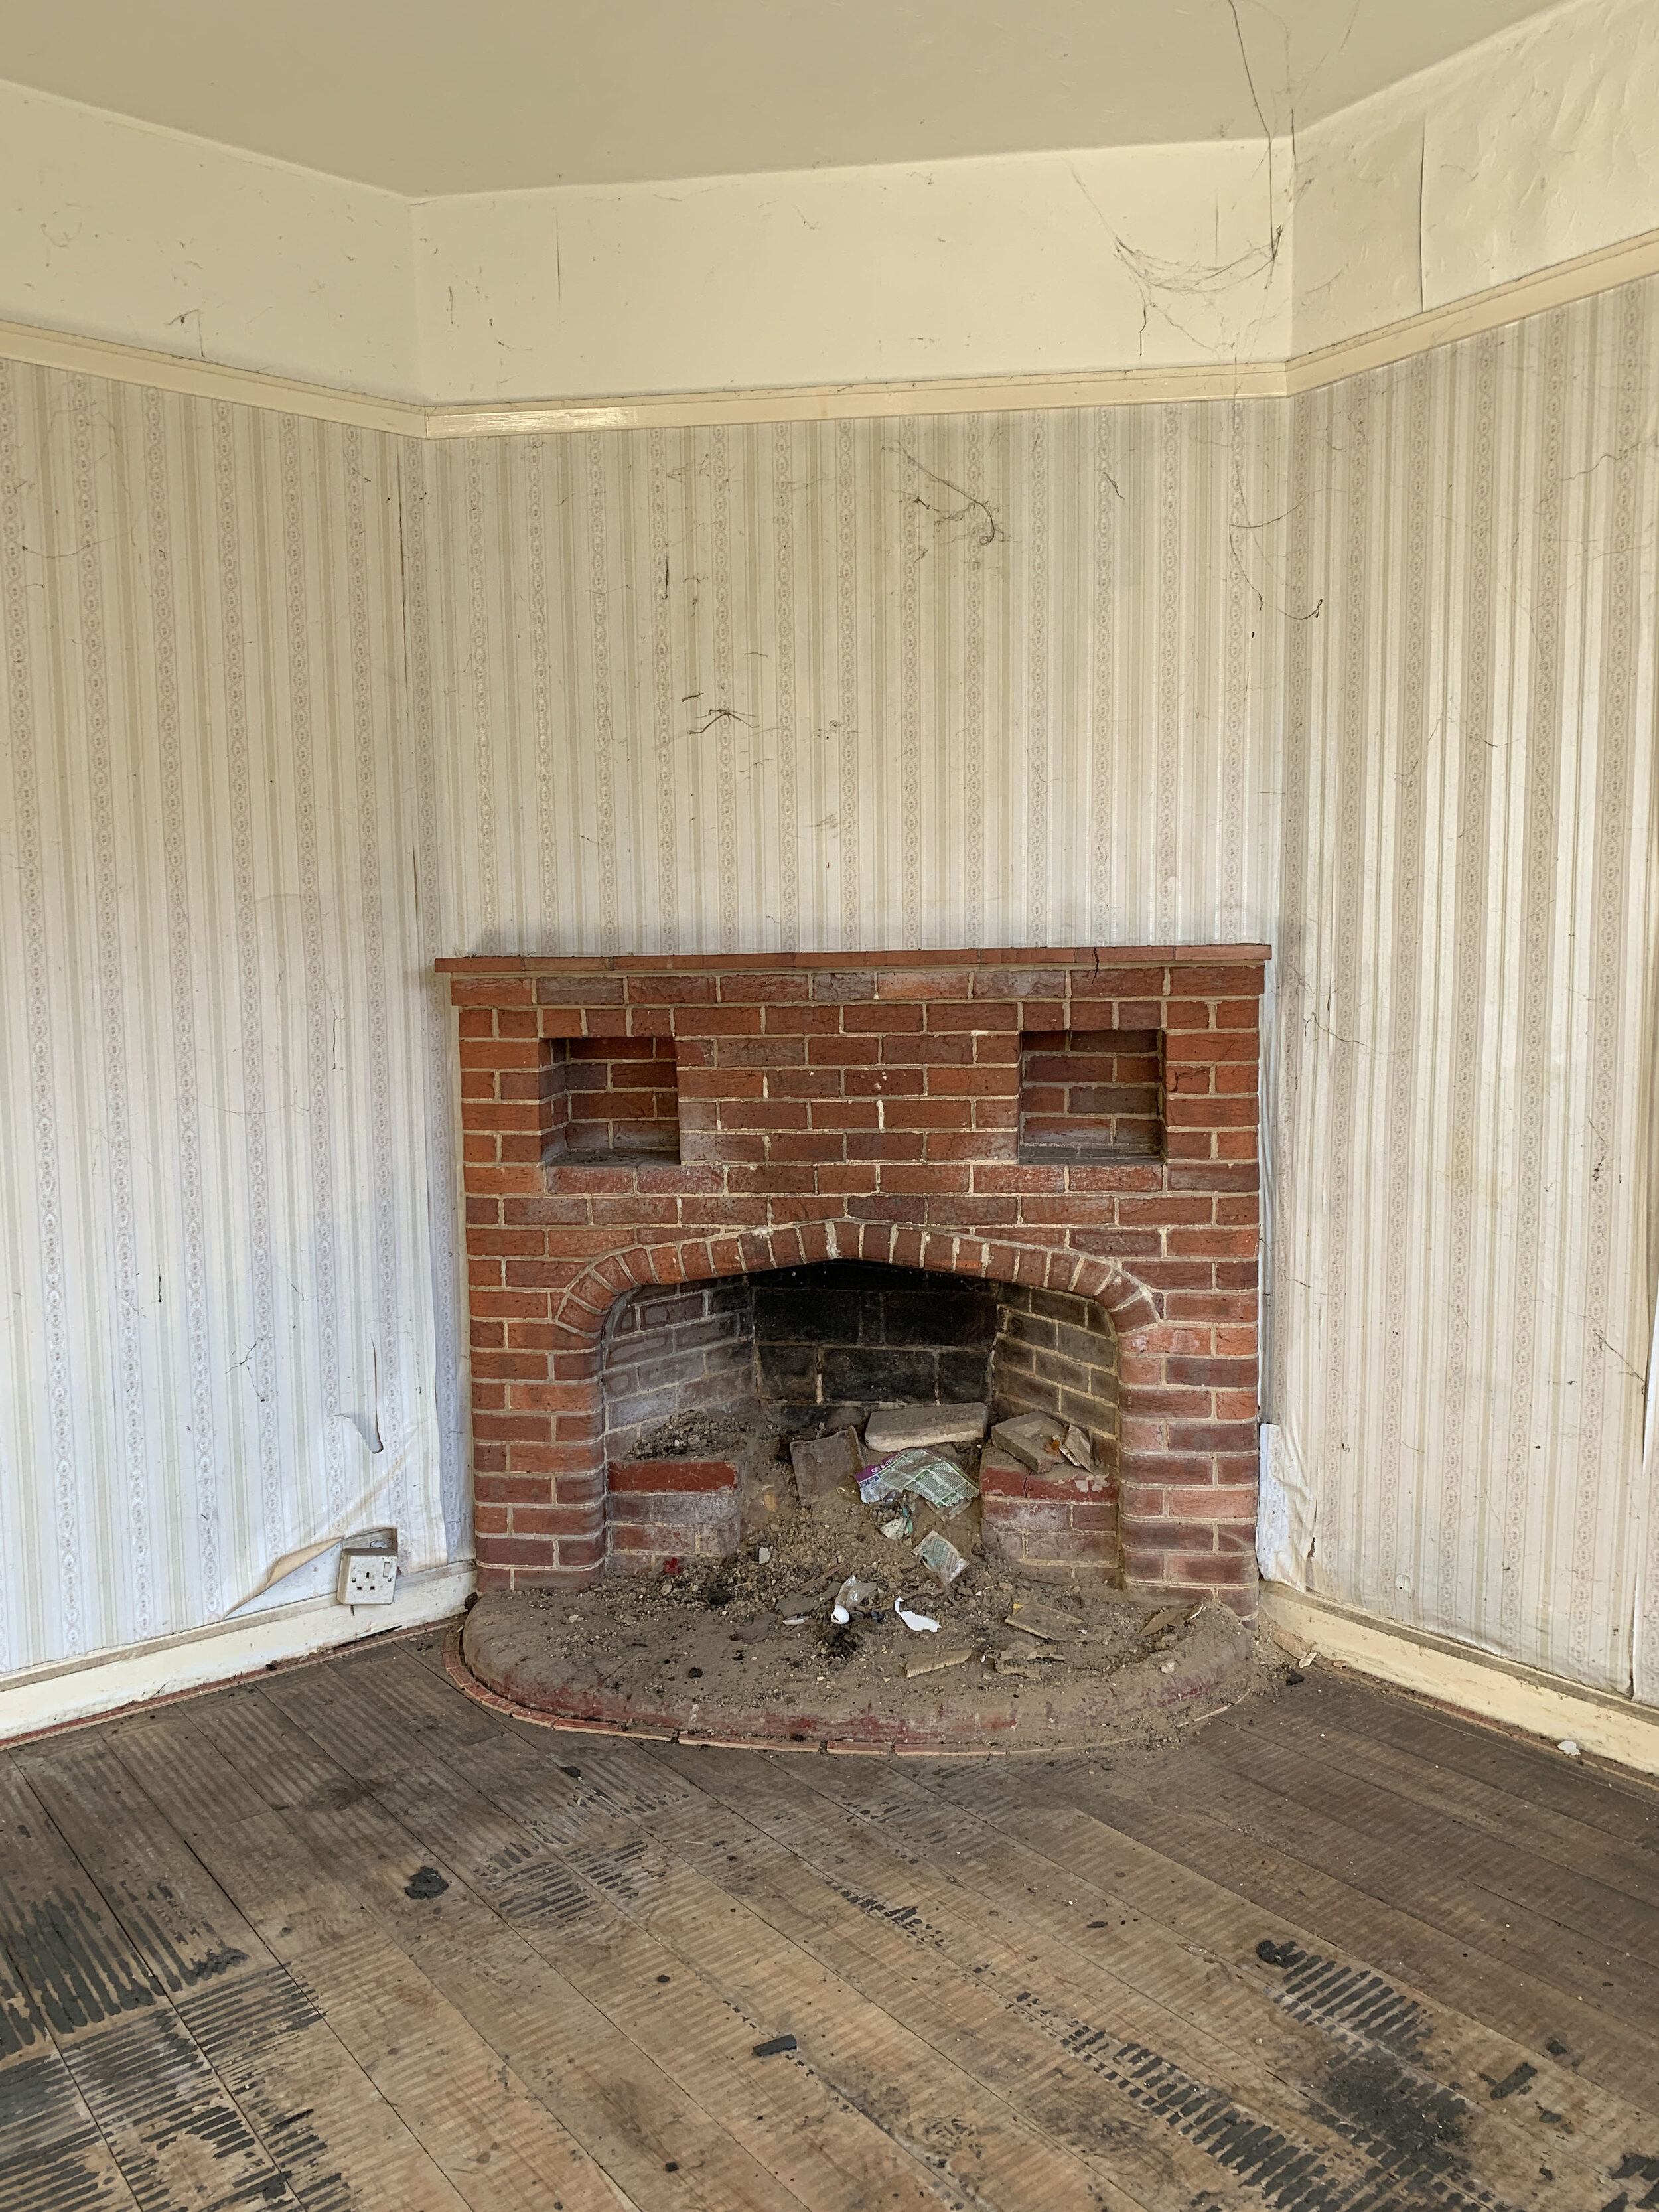
When we first viewed our beloved ‘Rat house’ and saw that it already had two 1930’s original brick fireplaces downstairs, we knew one of them had to be restored for a wood burner to sit in its place.

The original Brick fireplace at the Rat house that we decided to change into a wood bu

The original Brick fireplace at the Rat house.

The research

Whilst researching Wood burner stoves, the one thing that was really important to me, was that it had to be eco friendly. I know theres a lot of talk about wood burners not being efficient, so it was important to me to pick one that was eco design ready and had low emissions to have the longevity.

I also decided to have it fitted in the smaller of the two reception rooms, which is also our snug room, so picking one with the right heat output is important too. As its a small-ish room, I needed one that had a 4-5kw output.

With this in mind I chose the Solution 5 Smoke Control (S3) from Arada Stoves.

This clever little Arada stove is Ecodesign ready, has high efficiency and gives off low emissions. It’s also suitable for burning wood and multi fuel. Plus it has a heat output of 4.9kW output so was the ideal spec for our snug.

The fitting

This is where we called in the experts, aka our builders who are the kings of all things structural. Because taking an existing fireplace involves some structural work where lintels are involved. (Lintels are the joists holding the chimney stack up- so quite important not to mess around with if you don’t know what you’re doing).

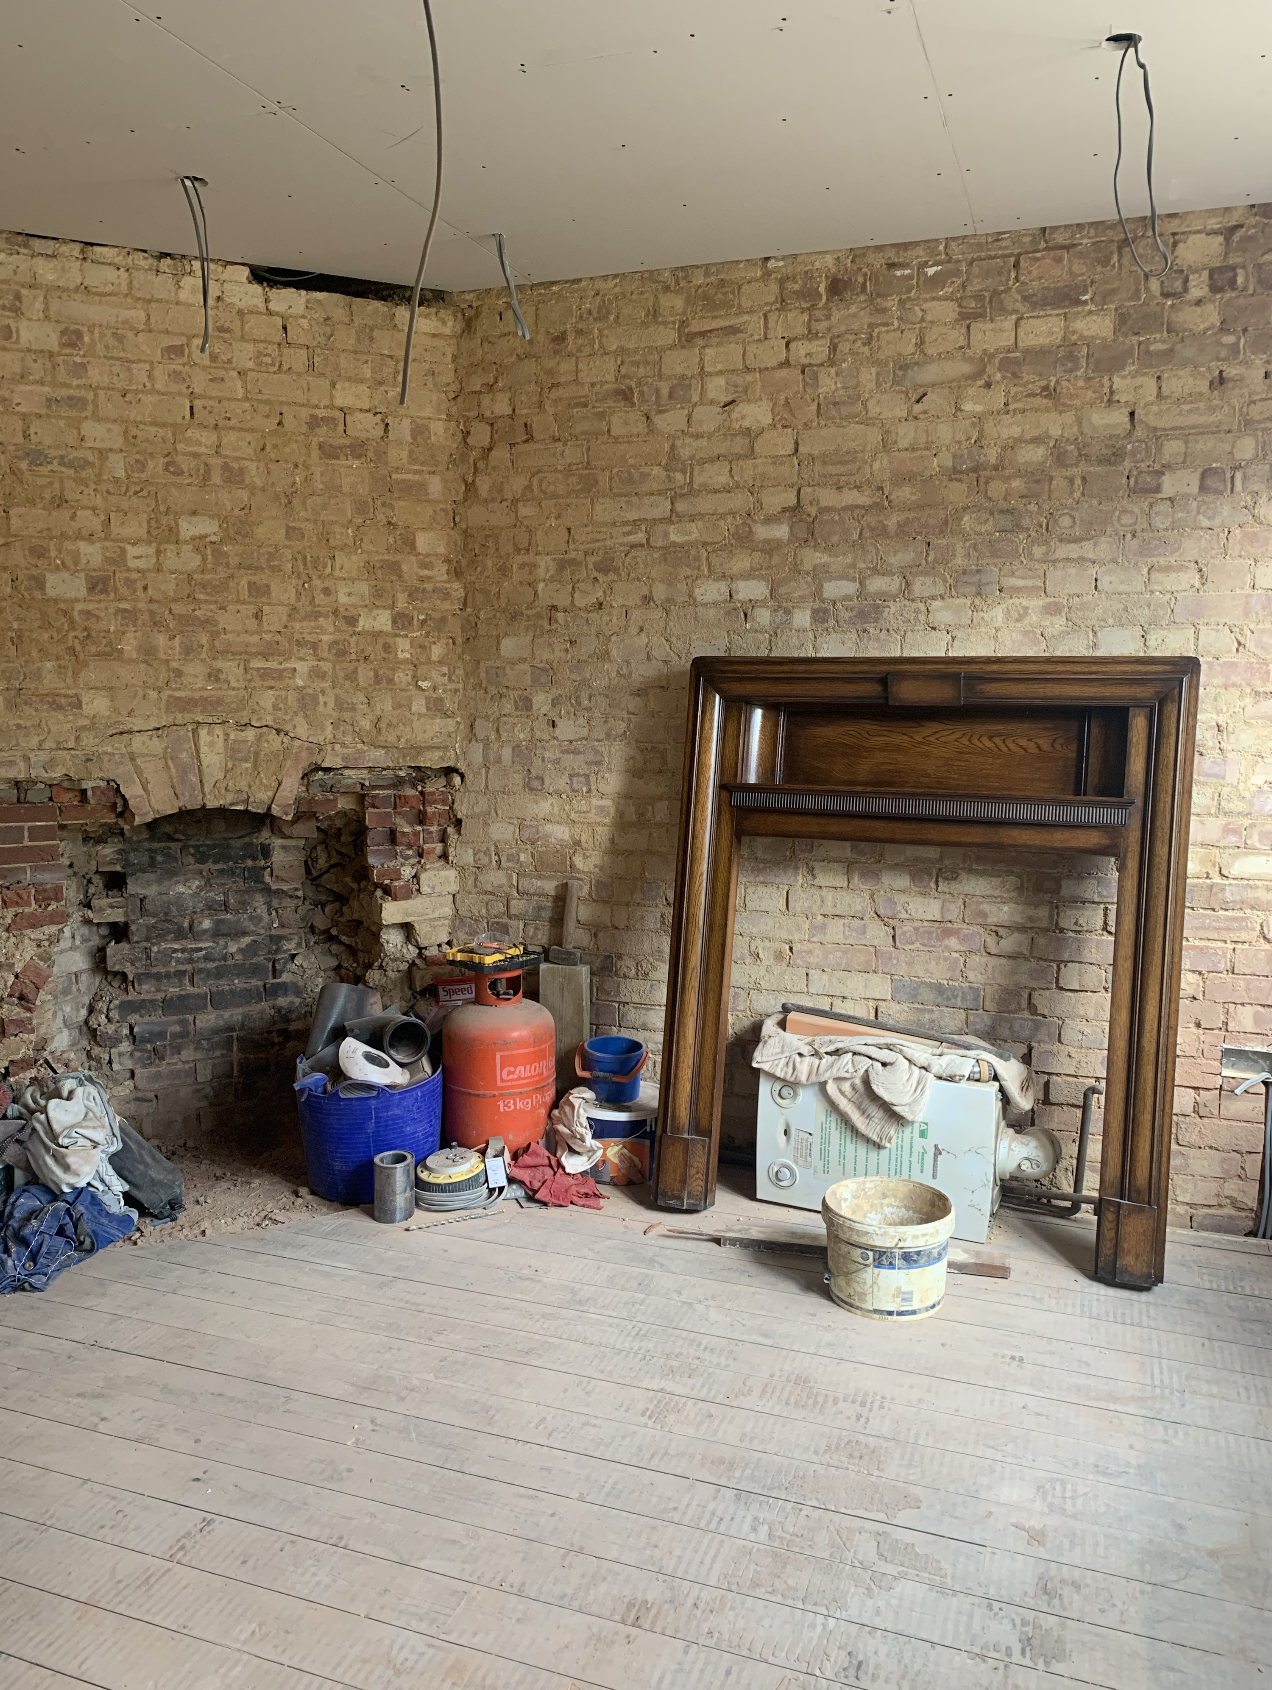
Our builders safely removed the existing Brick fireplace which by the way I have zero regrets about removing. Yes it was original, but it was FUGLY and I didn’t want it in our home for a second longer. And at the end of the day, you’ve gotta do what you want, for your home. Plus we were adding character back in with a stove, as thats what they do.

The removal of the brick fireplace

The removal of the brick fireplace

Once the fireplace was removed we called in an expert chimney sweeper to give the chimney a really good clean out in preparation.

Then, this is where it gets a little bit more tricky- we needed to line the chimney with a flexible chimney flue liner in order to fit a stove. Now, luckily for us our builders are skilled in this area, otherwise we would have had to call on a Wood burner expert to fit it for us.

It involves someone climbing up on the roof safely, and threading the flexible Flue liner down the chimney - until it reaches the exit in the snug. Luckily we had scaffolding up during our build, so I’d recommend doing this whilst you’re having your building work done and not adding it after. Or you’ll need a very long ladder and someone else inside to help pull the flue liner through.

FITTED FLUE .jpg
This is the  Plane register plate 1000mm x 400mm (To block chimney off above our stove. It allows the flexible flue pipe to run through and meet the enamelled stove pipe. This plane register plate was part of the kit from Trade Price Flues.

This is the Plane register plate 1000mm x 400mm (To block chimney off above our stove. It allows the flexible flue pipe to run through and meet the enamelled stove pipe. This plane register plate was part of the kit from Trade Price Flues.

I bought a kit with a 15m Flexible flue from Trade Price Flues, which you can buy from here. Because of our high chimney our kit cost £414 which is the going rate for these sorts of kits.

The kit included …

  • Super Flex Chimney flue liner (To line your masonry chimney) we chose a 15m one for ours .

  • Plane register plate 1000mm x 400mm (To block chimney off above your appliance and your stove pipe to run through)

  • Stove pipe to Super Flex adapter ( To connect to your stove pipe to your Super Flex chimney liner)

  • 1000mm (1m) matt black vitreous enamelled stove pipe (To insert into the spigot on your stove / appliance)

  • Pot Hanger Rain Cap (To suspend flue liner at the chimney pot)

  • Nose Cone ( To attach to your Super Flex Flue liner for installation) 

  • Carbon Monoxide Alarm (To make you aware carbon monoxide is present if there is a problem)

  • 500g Black Fire cement to  join your stove pipe to the spigot of your stove / appliance) 

Altho the kit came with a 1000mm (1m) matt black vitreous enamelled stove pipe (To insert into the spigot on your stove / appliance), we needed to buy a thicker twin wall insultated enammed stove pipe to meet building regs on our build, so bought this one from Amazon- 500mm Length Twin Wall Insulated Flue Pipe Inc Locking.

The much thicker twin wall insultated enammed stove pipe to meet building regs on our build. We bought this one from Amazon-  500mm Length Twin Wall Insulated Flue Pipe Inc Locking.

The much thicker twin wall insultated enammed stove pipe to meet building regs on our build. We bought this one from Amazon- 500mm Length Twin Wall Insulated Flue Pipe Inc Locking.

This is what 15m of Flexible flue from Trade Price Flues looks like ready to go inside our chimney.

This is what 15m of Flexible flue from Trade Price Flues looks like ready to go inside our chimney.


The Design

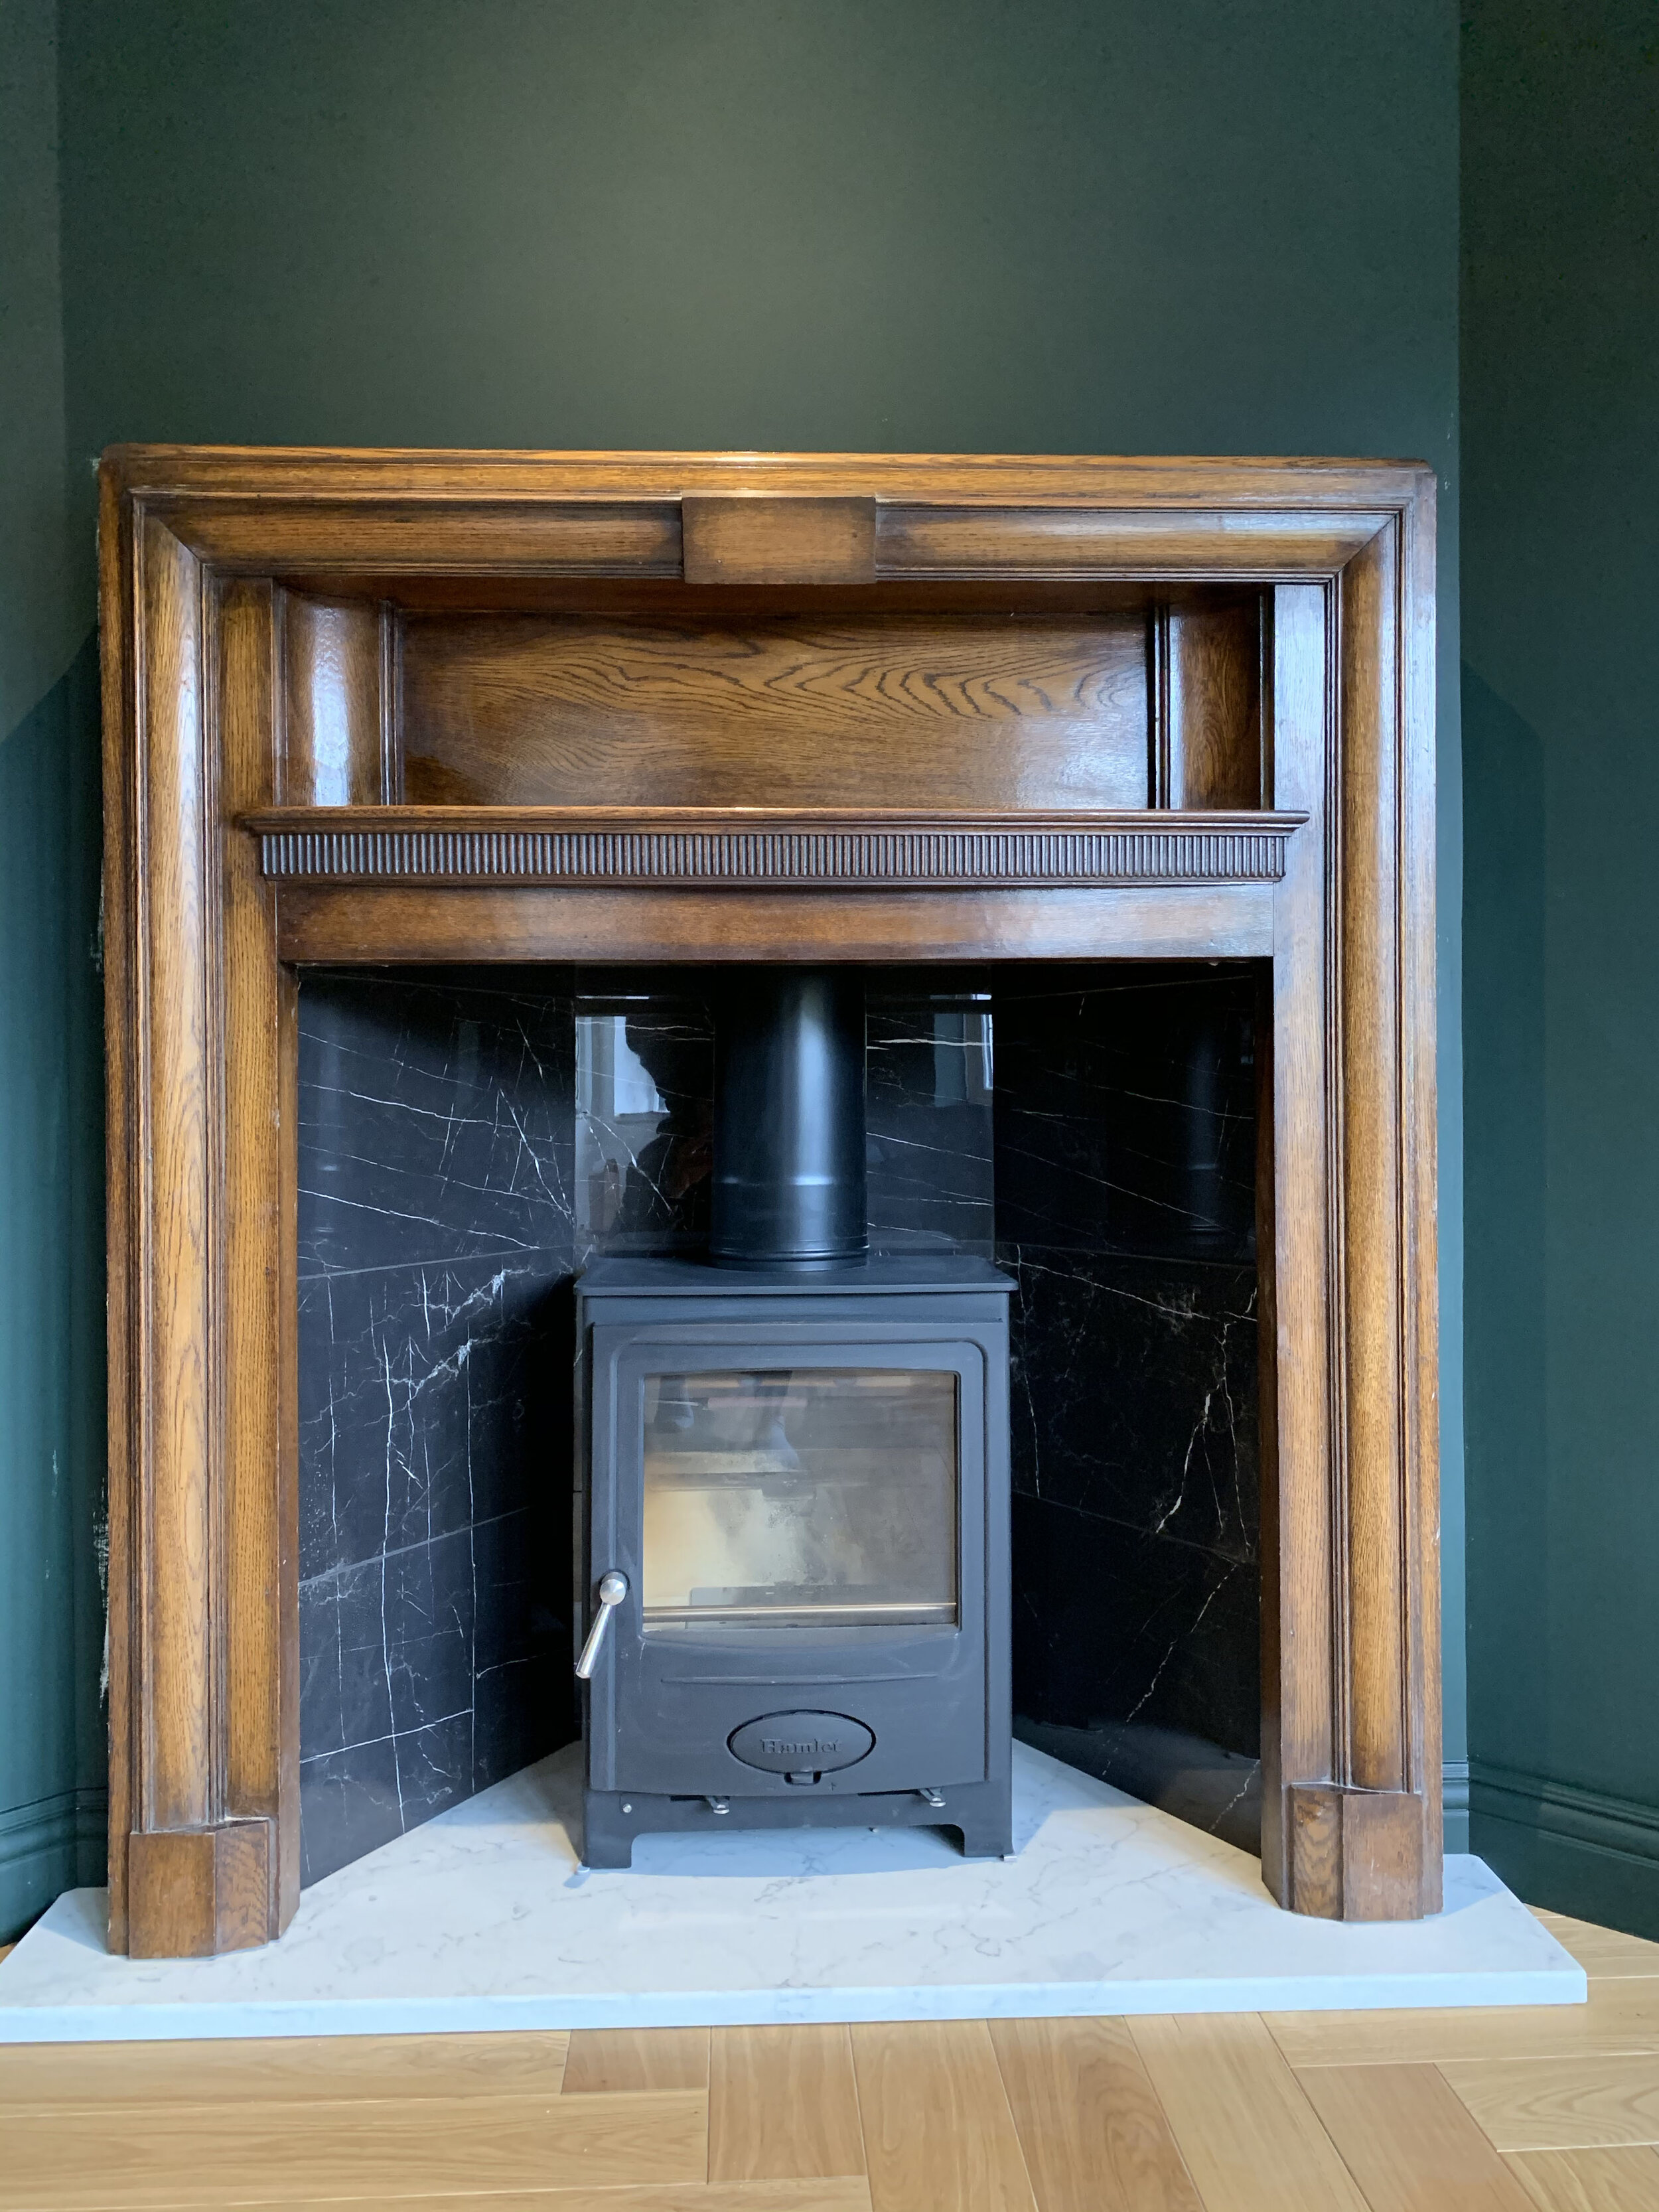
I now had to decide how I wanted to incorporate he Wood burner into the snug and make a feature out of it. As our house is a 1930’s and I had taken the original brick fireplace out, I managed to find an original 1930’s wooden fireplace surround on eBay for £26, plus the £20 delivery to get it to us- so it was an absolute bargain and something that felt like fate.

I found this original 1930’s wooden surround on Ebay for £26.

I found this original 1930’s wooden surround on Ebay for £26.

For the hearth I went to my local stone masons yard and asked if they had any off cuts and they managed to cut a piece of quartz stone for me for £40. It’s definitely worth asking them if you’re looking for one too. Plus this way you can have it custom cut to any size, spec and colour.

For the wall lining the wood burner, I chose the Torran Marquina Tiles from Topps Tiles, which are a black marble effect tile. These are the 60 x 30cm rectangular size and are suitable to be used for Multi-Fuel Stove Surrounds. At £6.64 a tile, and only needing 12 tiles, these were also a bargain to complete the look.

Our builders did all the fitting of the whole thing, installing the hearth, wall tiles, flue and connecting up the Arada Stove.

Our Solution 5 Smoke Control (S3) Arada Stove, Vintage 1930’s surround from Ebay,  Torran Marquina black marble  Tiles from Topps Tiles, in 60cm x 30cm size and the stone hearth was sourced from a local stone mason, Lick Paint Dark Holly Green 06 in…

Our Solution 5 Smoke Control (S3) Arada Stove, Vintage 1930’s surround from Ebay, Torran Marquina black marble Tiles from Topps Tiles, in 60cm x 30cm size and the stone hearth was sourced from a local stone mason, Lick Paint Dark Holly Green 06 in Matt for the wall above the picture rail ( £38 for 2.5L)

We also fitted a Carbon Monoxide Alarm on the ceiling, which is essential when fitting a wood burner stove or fireplace in any home. Once it was all fitted and tested, it was all signed off by building control as it was part of our build.

Our Solution 5 Smoke Control (S3) Arada Stove, Vintage 1930’s surround from Ebay,  Torran Marquina black marble  Tiles from Topps Tiles, in 60cm x 30cm size and the stone hearth was sourced from a local stone mason, Wallpaper is the Jungle Faunacati…

Our Solution 5 Smoke Control (S3) Arada Stove, Vintage 1930’s surround from Ebay, Torran Marquina black marble Tiles from Topps Tiles, in 60cm x 30cm size and the stone hearth was sourced from a local stone mason, Wallpaper is the Jungle Faunacation from Divine Savages , Lick Paint Dark Holly Green 06 in Matt for the wall above the picture rail ( £38 for 2.5L)

Christmas time with our Solution 5 Smoke Control (S3) Arada Stove, Lick Paint Dark Holly Green 06 in Matt for the wall above the picture rail ( £38 for 2.5L)

Christmas time with our Solution 5 Smoke Control (S3) Arada Stove, Lick Paint Dark Holly Green 06 in Matt for the wall above the picture rail ( £38 for 2.5L)

Christmas time with our Solution 5 Smoke Control (S3) Arada Stove, Lick Paint Dark Holly Green 06 in Matt for the wall above the picture rail ( £38 for 2.5L)

Christmas time with our Solution 5 Smoke Control (S3) Arada Stove, Lick Paint Dark Holly Green 06 in Matt for the wall above the picture rail ( £38 for 2.5L)

Christmas time with our Solution 5 Smoke Control (S3) Arada Stove.  Wallpaper from Divine Savages - Jungle Faunacation, Lick Paint Dark Holly Green 06 in Matt for the wall above the picture rail ( £38 for 2.5L)

Christmas time with our Solution 5 Smoke Control (S3) Arada Stove. Wallpaper from Divine Savages - Jungle Faunacation, Lick Paint Dark Holly Green 06 in Matt for the wall above the picture rail ( £38 for 2.5L)

It’s now in and ready to use and we absolutely love our Arada Solution 5 Smoke Control (S3) wood burner. I’m so happy we decided to add one to our snug. It brings warmth when we don’t want to whack the heating on, and feels magical having it fired up now it’s Christmas. It was truly the best idea, and brings character to a previously bland room which had a fugly brick fireplace and wasn’t too difficult to convert the already working fireplace into a safe space for an Arada Wood Burner.

Arada Stoves kindly gifted me the Solution 5 Smoke Control (S3) stove with no obligation to post. All thoughts and opinions are 100% my own.

If you want to read more about the design of our snug you can read it here.

HOW WE ADDED AN ARADA WOOD BURNER STOVE

OUR RENOVATION JOURNEY : THE PLAY ROOM/ DEN MOOD BOARD REVEAL

Jungle room play room moodboard

As we reach our sixth month anniversary of building work over at the ‘Rat House renovation’, I thought it was about time I shared one of my mood boards for our first room reveal.

Today I’m talking about our playroom/ den.

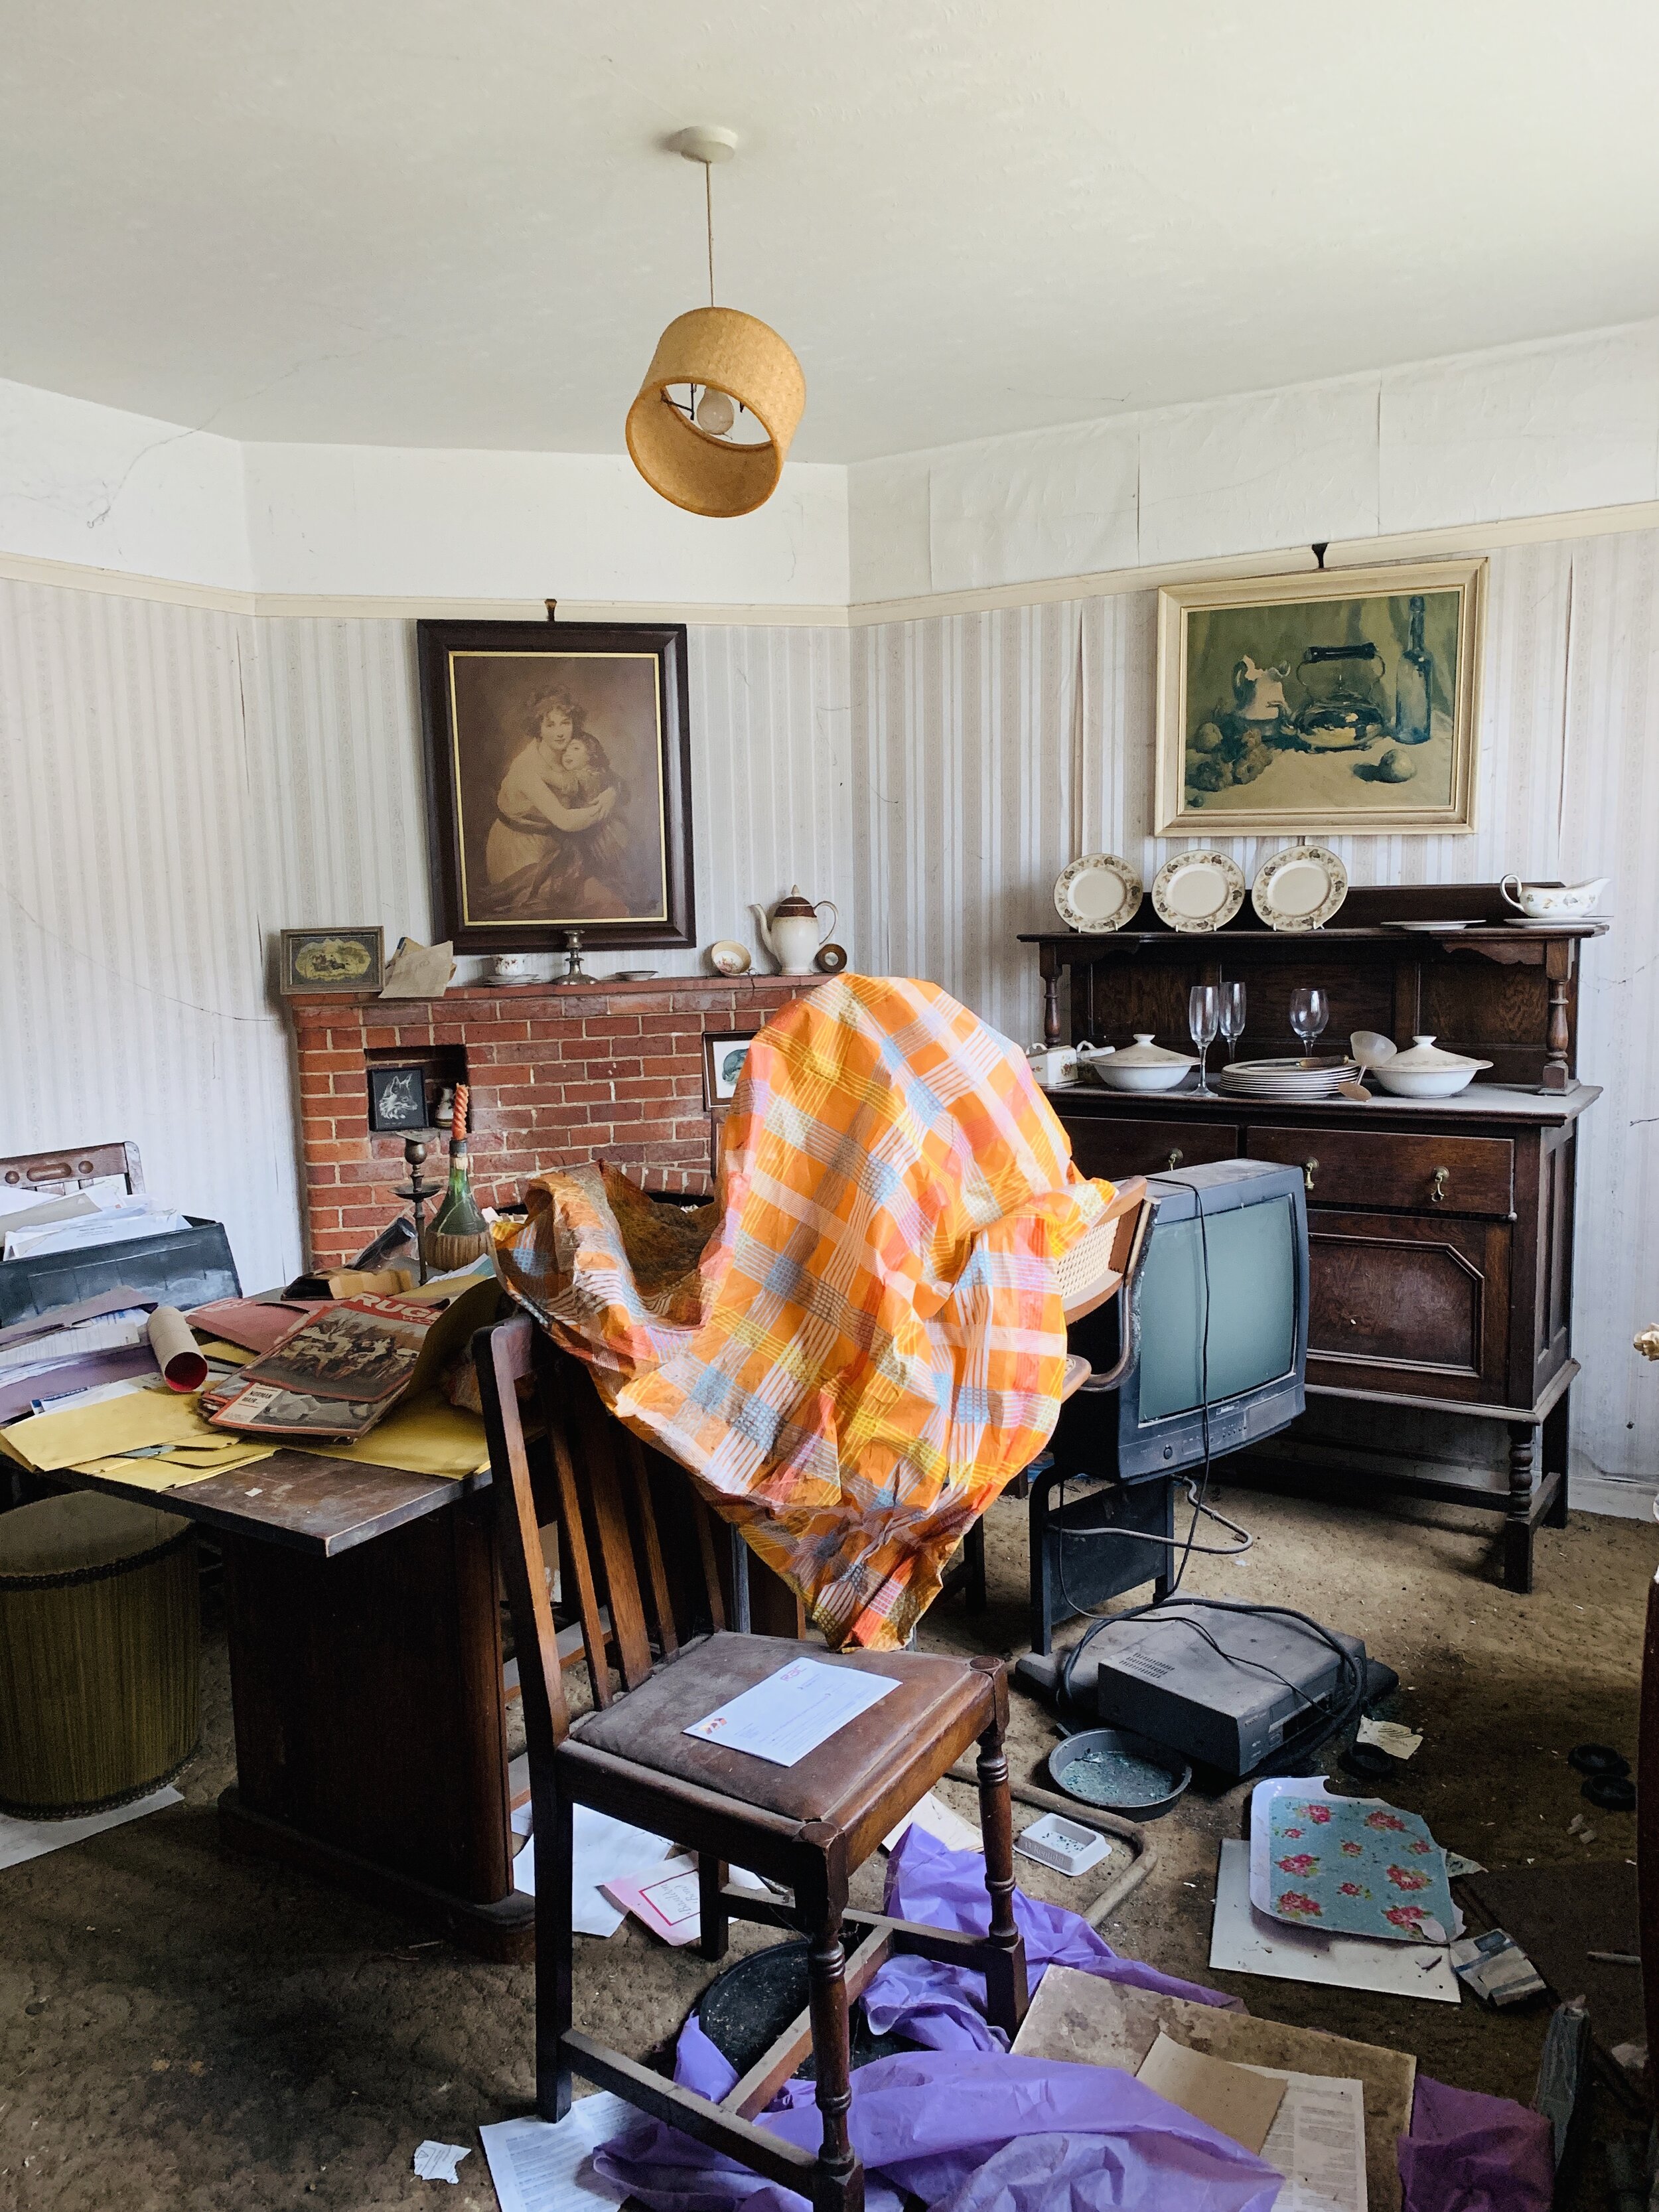
Located on the right side of the house on the ground floor, this room was previously used as a dining room by the previous owner. It was filled with antique furniture and a lot of rat poison (I’m not exaggerating- at least they were aware they had a problem), it had been left pretty neglected and hadn’t seen a duster or a hoover in a long old time, although it was easy to see that it must have looked beautiful in its former life.

The evolution of the playroom

This room is now going to be used as a playroom for our little boy during the day, and a cosy den for us Adults in the evening. A space for us to retreat in to watch a movie whilst having the eco wood burner on from Arada stoves (I’ll talk about this more soon).

Although we will have a lounge across the hallway from this room, we love that this room is completely separate to the kitchen/ dining space and you can shut yourself away and have more privacy. Aka, when I have my mates round and we’re drinking Prosecco in the kitchen my other half can lock himself away with a tv and a cosy wood burner and escape from the cackles.

 We want the space to feel fun and imaginative for Otis, but also grown it up and quirky in the evenings once the toys are packed away. I’m envisioning this room becoming a musical room one day in hope we might own a piano for our son, and then will evolve into his X box room, and then one day his pre drinks space with his mates. Ha, yes I am already thinking that far ahead! And although I’m sure I will have decorated this room a trillion times by then, I’m hoping I won’t want to change it for at least a few years (he’s only 2 so I have plenty of time until then).

I still need to research storage, but I’ve got my heart set on a large sideboard for our grown up lounge across the hall and would also love something practical and hardy for storing toys inside in this room. For the playroom I don’t want it to look too childlike, but it also needs to pass the toddler durability test. I saw a beautiful sideboard at a Heals press event which I literally dream about day and night, but sadly its out of my price range (even in the sale), and I’m under no illusion that this would work for a playroom, but I’ve still stuck it on here anyways as you should all see it.

We will also have a tv on the wall, away from little hands, which will also be handy as it will take up less space.

 But back to the wallpaper, and the theme. Because let’s face it, that’s why you’re all here.

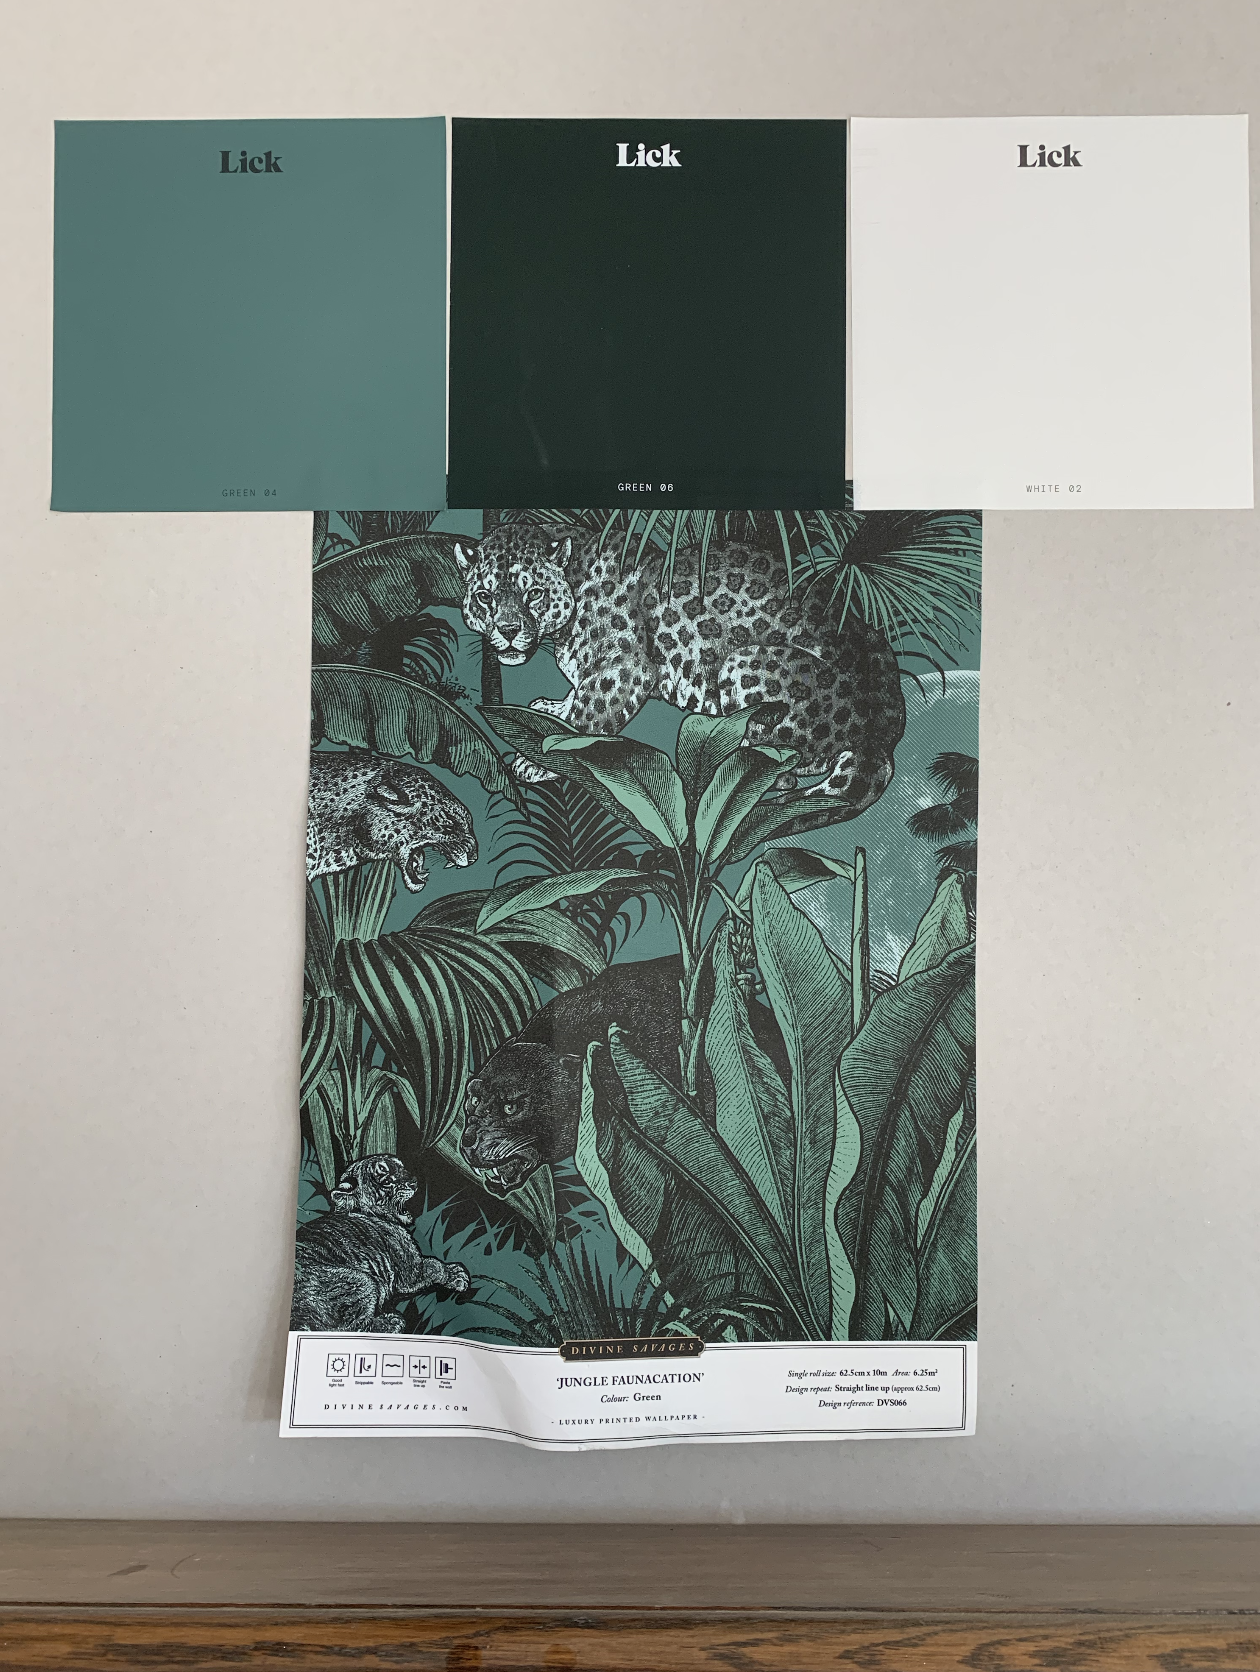
If you haven’t guessed already, we’re going for a subtle jungle theme in here. As you know we’re big fans of jungle prints, so it was inevitable that we should continue this theme into our new home. Plus, being a massive fan of Divine Savages and their beautiful wallpaper and prints and having had their Deco Martini wallpaper in our previous home I was super excited to see that they had launched a new colourway of their Faunacation print into the jungle greens, so it seemed like a match made in Rat House heaven.

And yes, I know what you’re thinking. I said I wasn’t going dark… I just like to keep you on your toes *wink. What I probably should have said is that I’m not going to have any Railings paint in our house which was a bit of a trademark paint colour in our old home. So much so, I wish I’d got ruddy shares in the stuff we had so much of it. But it’s time for a change, and this time I’m also giving some new paint brands a whirl to see how they stack up as I think it’s time for some new kids on the block.

We’re putting picture rails back up and will be wallpapering up to the picture rail and then painting above it in new paint company Lick Green 06 in Matt, then using Lick Green 06 eggshell on the woodwork and using Lick 02 white on the ceiling. Lick are a new paint brand which I discovered in lock down and I’m excited to see how their paint compares.

We’re getting some gorgeous new cast iron radiators from Best Heating for this room and for our grown-up lounge across the hallway- these are the Milano Tamara oval column in antique brass from Best Heating and are just stunning.

 We’ve removed the old brick fireplaces that used to be in this room and the main lounge and we have replaced the fireplace in this room with with a beautiful eco burner from Arada Stoves for extra heat, and I’ve bought an original 1930’s deco wooden surround  on ebay for a bargain £150 which I want to leave in the wood to contrast with the wallpaper and side board. And even though we have stripped the house back to the bricks and removed the original features, we’re hoping it will still have bags of character from what we put back in.

To furnish it, we will be super excited to be reunited with some of previous belongings which will fit nicely into this space, including our West Elm Drake green velvet sofa and Distressed Arabesque wool rug in steel for this room, and layering some of my favourite House of Hackney cushions which have accents of gold and teal to being some new colours into this space.

 I’ve also found some beautiful lacquered brass transparent light switches and sockets which are amazing to go over the top of wallpaper from Corston Architectural detail. They’re clear so let the wallpaper shine through whilst still being practical and having a pop of brass which I think will look amazing in this room.

 That just leaves me with deciding on a light and curtains. I’m hoping for something with a bit of drama like the attached Anthropologie Victoria tassel light or something similar.


So what do you think? Was it pretty obvious that we’d go jungle somewhere? You never know, the giraffe might even make an appearance in here at some point. You’ll just have to watch this space.

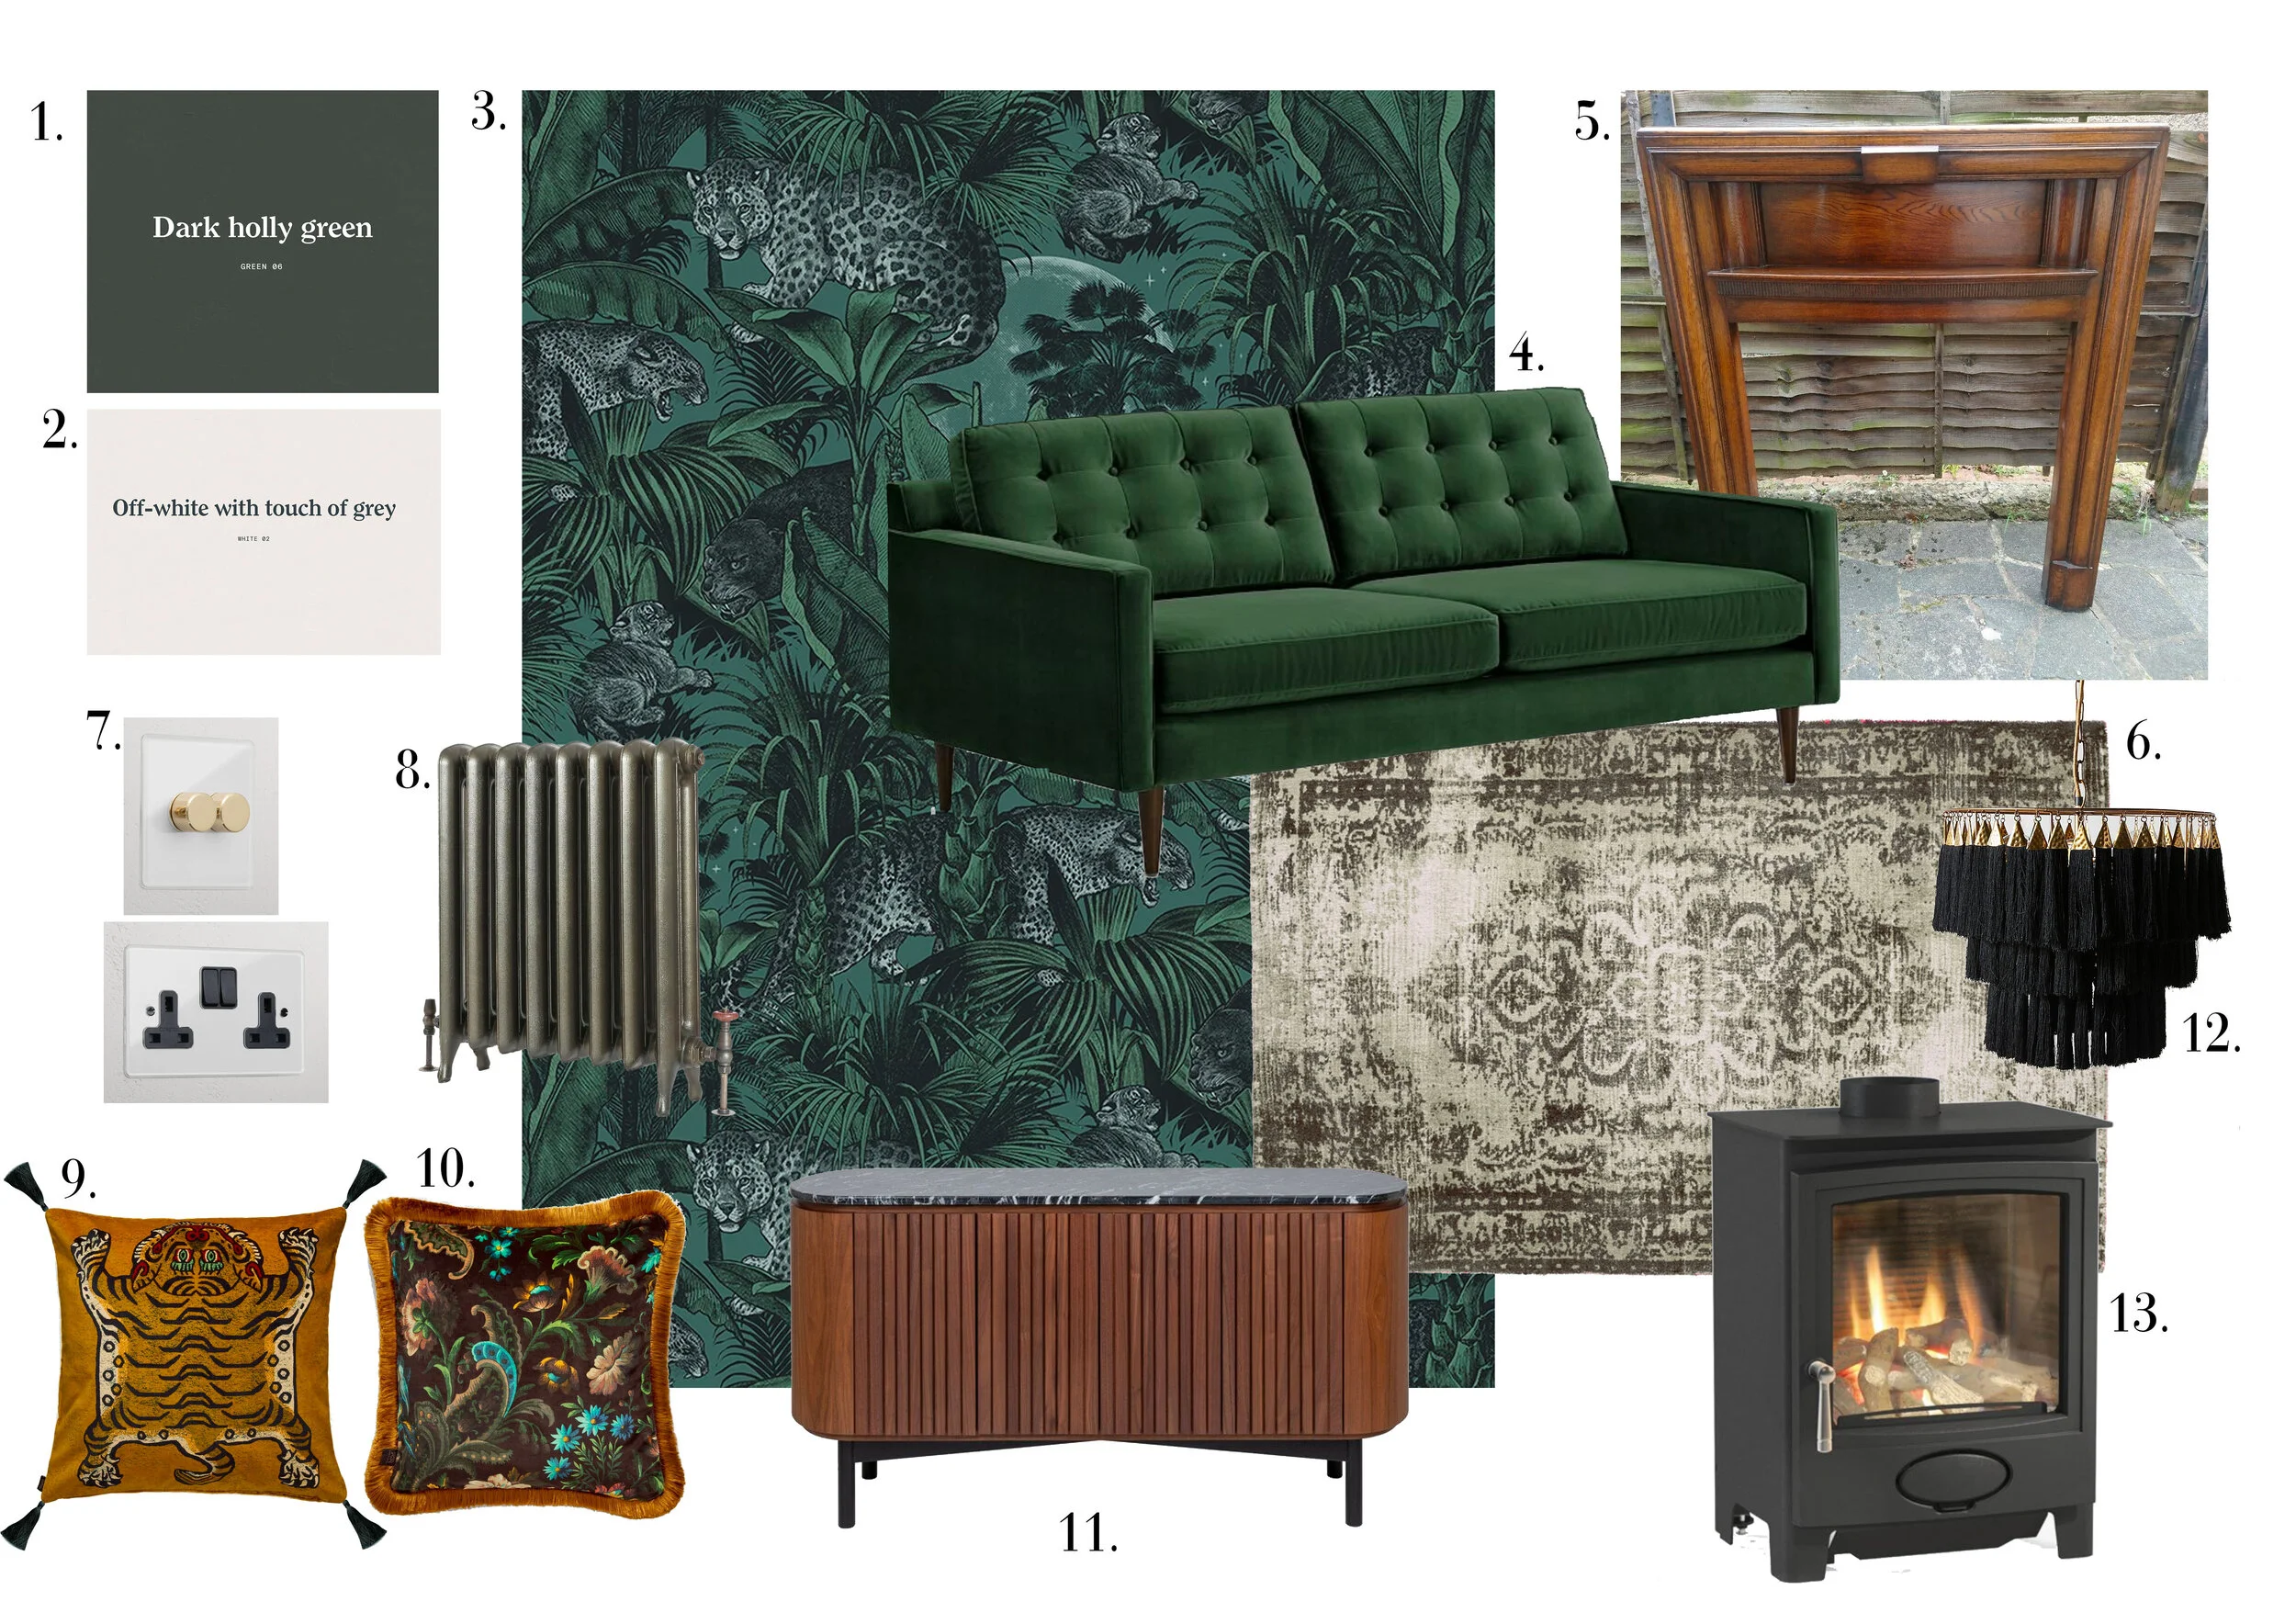
JUNGLE DEN ROOM MOOD BOARD
  1. Lick Paint Dark Holly Green 06 in Matt for the wall above the picture rail ( £38 for 2.5L)

  2. Lick Paint Off White 02 in Matt - for the ceiling (£38 for 2.5L)

  3. Divine Savages Jungle Faunacation wallpaper (£140 a roll)

  4. West Elm Drake sofa in Green Velvet ( £1,099)

  5. 1930’s original wooden surround purchased from Ebay £150

  6. West Elm Distressed Arabesque Wool Rug in Steel and £449

  7. Corston Architectural detail switches and sockets from the £28

  8. Best Heating Milano Tamara - Oval Column Cast Iron Radiator - 760mm Tall - Antique Brass from £229 

  9. House Of Hackney Saber cushion £195

  10. House of Hackney Florika cushion £165

  11. Heals Remi sideboard - large £2,639

  12. Anthropologie Victoria tasselled light £298

  13. Arada stoves eco burn from £879

I’ve also done a bit of research on beautiful sideboards as I’m currently looking for two and have become sideboard obsessed.


sideboard research